Monday 28 December 2015

A rather lengthy reply to Jennifer's message

Thanks Jennifer for leaving a comment - much appreciated.  It is always nice to get some feed back from folk to see if I am being any help to anyone.

I did put a note somewhere about using eye protectors and a mask - maybe not on the video you saw - I must go back and have a look and add it to all of them.  So thank you for prompting me to do to that.  You are right - I hate MDF dust - irrespective of  health issues - it makes me itch and drives my eyes nuts so drilling and sawing is really truly best avoided as much as you can.  Indeed I have actually gone back to cutting two lines with a knife and gouging out in between as I am not a dab hand with the Dremel and really can't be bothered mastering it.

Don't let that put anyone else off - some folk love them and get loads of good use from them.  Horses for courses in this game.  Like any other hobby you find what fits you.

It is difficult with a blog and videos spread out over different time scales to recall what is written or said where so, yes, I did mention a lino cutter somewhere in passing but it is good to remind people that this is a very good alternative.  The only reason it didn't work for me was that I was a cheapskate and bought a second-hand blunt one!  

So, in summary - cutting grooves - 


  • Rotary tool if you like them and are a confident using them and remember to wear safety glasses to protect eyes from flying broken tools (it can happen) and a dust mask over nose and mouth to protect you from dust.
  • Lino cutter - good size - brand new and sharp
  • Box cutter (strong knife) score two lines and gouge out in between
  • V-shaped chisel - again new and sharp
Any other ways of doing it please share here....

Thanks again Jennifer, nice to meet you.

Tuesday 8 December 2015

16 Tips for electrics 2


Just to let you know I haven't disappeared off the face of the earth.....

I have made a few videos that will appear roughly one a week.  Actual work on the mini house has given way to real work on the house we live in.  There are all sorts of jobs going on which seem to take up my time.  By now I am sure this will run me into, and then, past Christmas.

One exciting thing is we are adding a workshop to the side of the house just for me.  Well, that's the idea right now and men are hammering away at it as I type this.  I just hope against hope that I actually settle in and use it.  The fall back position is that it will make a great storage area for stuff from the loft and other inaccessible places so it will have a purpose even if I fenague (heaven forbid).

Meanwhile here's the second part of wiring the project.


Saturday 28 November 2015

Putting in lights, fires and anything else electrical

On my videos I showed various ways of drilling holes for wires and making grooves for them; here's my absolute definitive way to do it as far as I am concerned.

Not all ceiling lights will just be in the centre of a room.  You might want a hanging light over a dining table for example.  The first step must be taking time to be absolutely sure you know what you want where.  

One way to help you position the lights is to draw an accurate floor (ceiling) plan to scale and plot out where the light should go in relationship to your needs (furniture etc).  I have seen a ton of low hanging chandeliers that no human could walk under in many dolls houses, maybe you want to avoid that in some way.  If your Georgian house doesn't give you a ten inch or more ceiling height then your powdered wigs would very quickly catch fire when moving around the grand salon.  Equally candles can not be too near the ceiling or the walls for the same reason.  My sitting room, for example, won't have a single hanging light as it is only an eight foot high room.  Deduct three feet for very small chandeliers - the grander they are the lower they hang - and I am only left with a five foot walk space beneath.  Clearly daft if you are aiming for any kind of realism.  Like many real Georgian rooms it will rely on wall sconces and candles on stands and candelabras on tables even if they are now electric!

If you need to see your room in 3D rather than in plan form and have the furniture already - put it in place and think about where your light should go.  Failing that make a really rough mock up to give you some sense of what's needed.


utility room

My utility room needs a light over the 'work area' but not too near any wall cupboards.  My plan of putting the lights in the basement area to enable me to get up to start the second floor may be delayed again as it would be better to get the cupboards in and the floor and ceilings trimmed in this room without a light in the way when I am working.  Curses - I hadn't thought of that.  Quite literally it is back to the drawing board for me to draw up plans for the utility room and then order up the flat pack kits from ELF.

test wire

It is useful if you have some spare wire to test in the grooves as you make them so you don't maul your actual lights around too much.  I have a roll of it but any little snip will do as long as you test it down the full length of the groove to make sure it lies in there nicely.


Ironically the other thing that is handy is some sort of light in the space that you want to light!  It is decidedly dark in most dolls house rooms.  Here I am using one of those lights you wear on your forehead when working in such restricted spaces but it is more useful just plonked on the floor of the room than on my head which doesn't actually go inside the room when I am working there.  An ordinary torch works just as well.

These two photos show two different ways of going about the job of making a groove.

manual method

After drilling the hole for the light and the wire exit hole I used a steel rule and box knife to cut two slits, close together from one hole to the other.  I then gouged out the wood in between with the file.  Easy peasy. It took a matter of a couple of minutes and gave me a nice straight line and tidy groove. 

power tool method

Here I used a steel rule, box knife and Rotary tool.  Ended up with a wobbly groove which even had differing depths and it took longer than the manual method.

Seems like a no-brainer to me which method to choose.  I cut my third groove (and all that will follow) by hand.  Forget investing on a rotary tool for the job like I did unless you are a tool fanatic....  they do exist.

However, I would recommend a power tool for the drilling part of this exercise. It is in no way essential but it was so easy with a right-angle power drill.  You can get an attachment for any power drill I think if you don't want to buy a separate right-angled drill.  That said, mine came from the internet cheaply and is battery powered so gives me easy access.  Hand drilling takes a degree of muscle power or it takes forever.  Slight pressure on the head of this drill, over the bit, and it took a couple of seconds.  Six holes done seemingly instantly.  Works nice and vertically in the centre of the room (for the light fitting) and works fine at an angle at the back of the room (for exit holes).


Thursday 26 November 2015

Promo - not really


My time this week has been spent making half a dozen videos for the You Tube efforts I put out.  I am trying to assemble some notes/tips for newbies about putting in electrics.  However, I thought I would share some thoughts here too before showing you any actual work done on my house .....  truth is there isn't any actual work done..... but I swear, now all the kit is out, I will be adding lights to the basement tomorrow.


Image result for copper wire system for dolls house wiring


First decision when wiring a house is which system you want to use.  Round wire v. copper tape.  In discussion with a real expert and all round gentleman of wiring we did agree that round wiring is probably slightly better than copper tape.  His thinking was that in the hands of the average person copper tape can be fraught with issues.  He also said that it is not as long-lasting or easily repairable as the wired system is and really needed to be assembled with some good soldering.  You should also avoid acid wallpapers as they can have an effect on the copper wires over time.  If you do have a problem with it you will have to locate the 'break' (not so easy when covered with paper) and then you you'll probably have to strip a room or rooms to get it sorted.  With the other method if you sit your round wiring in deep grooves under the floor covering (make sure the floor covering is easy to remove) it is not such an issue to deal with a single light that has gone out for some reason.  It also means that you could just replace a light or fire with something you like 'better' at a later stage.

For round wiring you will need to be able drill holes where the light will hang and make a groove from there to the back wall with a further hole through that wall to allow the wire through to the power source at the back of the house.  All of this, of course, assumes a front opening house with wiring going through to the back.  You may need to vary this depending on what you're building.

Drilling holes can't be done with a normal power drill once the house is built as, usually, you only have a 7 to 10 inch space between floors and you can't get a drill in there vertically.  You can buy a right angle drill attachment for your power drill or even a specific right angle electric drill and these will do the job beautifully.  Most people will find that they can manage very well with various manual drills - again not in the usual size but there are small drills for tight spaces if you look around the web.  A pin vice will do but needs a lot of pressure.  An Archimedes or screw drill is a bit easier and you can get the little old-fashioned sort with a winding handle.  I did say a pin vice needs a lot of pressure but to be honest I find all drilling is best done by someone with muscles.  It takes me about three times longer than my husband to make a hole in MDF even with a power drill.

Cutting grooves is a bit more fraught especially if you are going to be doing a lot of wiring.  One way round this (I haven't done it) is to surface lay (no grooves) all your wiring across the ceiling or across the floor above and add a false floor or ceiling to cover the wires.  In effect you are making a sandwich of the kit floor along with a piece of card or foam-board or maybe thin ply (?) and a few strips of something between to make supporting spacers.  I wonder how much that layer would show from the front of the house when it is open?  Maybe you could add a trim?

If you do make grooves the most basic way to cut one is with a steel ruler and a knife.  Cut the line you want using steel rule and knife and then a line in parallel nearby and then gouge out the wood between using the knife or lino cutter or v-shaped chisel.  It is much easier to use a rotary tool with a carving attachment.


cut lines with a knife, channel with rotary drill and tidy up with a file


When you have the required hole and groove, thread the wires through the hole, lay them down in the groove, exit through the back, tug gently to make them lie neatly in the groove and then tape them down with some masking tape to make sure they stay that way.


don't remember now why the hole and groove aren't in the same place, but there was a reason


Most lights come with a plug attached; this will need to be removed by pulling out the two pins, releasing the wire and removing the plug.  You then replace the plug by reversing the process at the back of the house if you are going to plug it into a gang plank type socket.  This will then go to an adapter and then the power source.  I don't use these power strips but this is one I had in the beginning of my mini life.


I don't like putting plugs back on - it is a fiddly job and the power strips are generally cheaply made and not wonderful.  The whole thing can also be extremely bulky if you have a project with a lot of lights and fires.

I'll show you an alternative method when I get to that stage.  For now there is enough here to get you started - along with the videos if you want them.  I warn you they are rank amateur and are not to be taken as an instruction - just sharing.

Friday: Have posted the first 'electric' video - just click on the YouTube link at the top of the left hand column. 

Monday 23 November 2015

York Show

I am one weary woman, even the day after the York Show.  Four hours solid mini shopping is about my limit it would seem.

Go to the Show Blog if you want to know about the show itself.

I am hoping that my latest purchases give me the much needed spur to get started again on my project.  To be fair much of its languishing is that I really haven't had time since we got home to settle back into it but, looking at my diary for the coming week (busy today too!), I may be able to get going again.

The show was also a part-excuse for not getting anything done as I would have liked some unusual lighting and thought I would hold off until after the show.  I was hoping to 'fall across' some lights that would please me but, in truth, I didn't have high hopes as I pretty much know everything that is out there.  I was right - either I have them already or I don't want them.  So, I will definitely have to use whatever I already have and get the basement lit as my next step to allow me to travel on up a floor and get started on the ground level of the house.

Here are my treasures arranged in groups from the five vendors I bought from.  You can see each item separately in the Purchases Album if you want to.


Mini Mcgregor

Lovely scale and detail on her stuff.  You have to pay a visit to the opening matchbox that she makes...knocks me out every time.   The Christmas parcels are actually in her 1/24th area so they make beautifully wrapped small Christmas gifts.


The Ironworks and Black Country Miniatures

I have no idea what I will do with the Christmas decorations but they just had to be had.  As for the others - yet more stuff I once owned and have had to buy again.


The Craft Pack Company
Did I mention I have chosen pre-Christmas as my moment in time - not sure if the decorations will be up or just being sorted - right now think I prefer the latter otherwise the house with get 'swamped' and I don't think I want it to be frozen like that.
Delph Miniatures

These Delph creations were bought in two goes as my first attempt was well-disciplined and I knew my spending limit.  About ten minutes later I went back and bought the rest.  The sort of logic is - I have to have them some time, so...

Maria's Fabrics

This is really gorgeous silk at a really good price - £1.80 a piece and 11 x 13 inches.  I also got some very nice cotton fabric for 90p and some cute chenille fringing (no idea what for!) which was in her 1/24th range.


Saturday 7 November 2015

Don't raise your hopes

Apologies that this is still not a post showing any progress on the house.  We have been back nearly two weeks but the real house and friends and family have taken up our days.  I am itching to get back to playing.  Hopefully now my real life jobs list is decreasing....

Meanwhile - how do you store stuff?

I had to have a grand clear out to put stuff away from the States and to free up cupboard space space for 'proper' household stuff.  Eventually I ended up with all the bits and things I have collected so far to go in the house sort of left over.  Maybe you have enough sense to build it first and then buy the stuff.

My solution for the time being are these five boxes.


Just to add to the collection, the rest of my little people arrived today courtesy of Minimum World.  I commend them to you - great service.  I ordered the figures and then realised I could have also ordered some lights I wanted to save on paying delivery from them and then delivery from DHE.  Swift email to them and equally swift reply saying they were added to my order which was being picked and that there was now no postage charge as the order was over forty pounds.  Next day the parcel arrived.

I have owned two of these three before!  How annoying.

Here's the final line up:


left to right:  

Elizabeth, mother and main protagonist in my head story.
Joanne, daughter
Simon, son
Eileen, housekeeper and surrogate grandma for the children
Annelise, French PhD student/lodger

I wanted you to see them side by side in hopes you can see the difference in quality.

Elizabeth and Simon are the cheaper range which I think aren't as well-modelled or well-painted and definitely run a little smaller.  Joanne, Eileen and Annelise are usually more than twice the price but are larger and better made pieces.  I am never comfortable mixing them so I try to stage the moment in time so they aren't cheek by jowl.

An inhabited or an empty house is always a dilemma and I can see virtue in both.  I also understand the desire for some of the lovely dolls/dressed figures that I see at shows but for me that does sort of make the house a dolls house (which is quite right!) but I sort of want a miniature more than a dolls house - hope that makes sense.  Currently these resin figures are the best compromise between all these tussles, for me.

While sorting out something for them to sit on I committed the ultimate in miniaturist sins and dropped a piece of furniture - one of its lovely legs broke.  My sin was compounded because I haven't brought any super glue back with me from the States, so it sits glaring at me until I can (hopefully) fix it.


Here's the light I bought for the Rec room - it will also have a couple of table lamps so it should do fine in there.  I need to have all the lights for the basement sorted so I can get up to the next floor.


Again it is something I already owned and gave away.


OK, here is something I hope someone out there is going to find useful.  No use to me as I don't have small boxes on display but if you do how about these already lit boxes from Ikea.  The light is coming from the bottom of the box but maybe they could be turned over if you wanted to light the project from overhead?

I am sure the label will alert you to the fact they are from Ikea.


Tuesday 3 November 2015

My lovely Linda Tulchinksy box and other stuff

I promised you a link to the photos I took of the lovely little box I won in a raffle at the Atlanta show, here they are:  LT Box

I haven't had a chance to take better ones or more of them but even with what I have here you can see what a great prize that was.

I did manage to get an address for the lady who made it, so I was able to write her a note to thank her.  I also am indebted to Kim Sher (organiser of Florida shows) for her help and kindness in emailing that to me.  Sometimes in life what goes round, comes round.  I was able to drop off an electrified turntable with her when we did our overnighter in Orlando before flying home.  Here's a snip from my Clavering describing that expedition:


Our next delivery of the day was a large electric turntable I had. It was brand new, cost around sixty bucks and would have been binned had I not had the brainwave of asking Kim Sher ..... runs the Miniaturia shows ...... If she knew anyone who could use it. She was going to collect it from us.


I gave her a ring and we decided to meet her and her husband in The Tavern in Celebration. So, off back to the car and a thirty minute ride over there. Guess what, they also had a festival on (Oktoberfest) with roads closed and no parking any where. Clearly the Naples Gods had hitched a ride as, by pure fluke, we pulled up behind the back of a restaurant where there was a tow truck to ask directions. The building turned out to be the Tavern. I asked the tow guy if he'd let my husband 'lurk' while I delivered a parcel. Deal done, I dashed round the corner only to discover the restaurant was pretty big, totally full and I wasn't all that sure I would know Kim in mufti. Indeed, I have no idea how I found her, or recognised her, but I did.


..........  and here's the article itself in case you haven't seen one of these - utterly brilliant but too big to take home.  It allows you to light your house but still turn it a full 360 degrees:


We have been back a week and there is still some sorting out to do especially as we intend to 'refurb' the house!  Hopefully this doesn't stop me returning to my mini project very soon.

First off, in my workroom, I had to find a place for all of these:


No wonder we couldn't bring much else back with us!  I also had my on-board case filled with the more delicate items.

I had to clear out the triple wardrobe in my work room as it was needed for extra clothes and linens from Naples.  So the best part of one day was spent having a huge sort out and tidy up and an extra piece of storage kit added.  Maybe now I am good to go.


This is a trolley from Ikea - not especially cheap at £49 but very sturdy and capacious and rolls around easily.  It was hard to decide what to put where but this is the work in progress.  Basically it holds stuff I'd like pretty much to hand rather than put away in drawers.


Wednesday 21 October 2015

Really, truly...well probably....last purchase ever from American eBay

Whenever I am here I overdose on American eBay for minis.  There's a running average of about 150,000 items even if you restrict it to USA only, compared to about 70,000 in the UK.  That said, when you consider comparative size of the two countries, UK is doing much better pro rata.  The heck with statistics I just have more to go at over here.

So here's my last find/bargain:


It is probably a Houseworks item but was described as having come out of an estate sale dolls house, so it was a bit of a punt as to condition and if it was working OK.  Seller said it was.


Hey presto, it was.  Here's a reminder of how to test your lights easily.  Just a nine volt battery and split the wires and touch each to a terminal.  Doesn't matter which one to which.

I am struggling to find a plainish chandelier for the dining room even if I was prepared to pay an arm and a leg for it.  These Houseworks ones cost about twenty pounds at home, I think.  I got this for twelve dollars including postage so I am pleased with my last find.  Also at that price if I do find the perfect one before I come to need it, this won't be a huge loss.


Saturday 10 October 2015

Guess who..

I had to come out of my (24 hour) retirement because I received a package today that is so exquisite it has to be shared with other mini folk.  My other half is a rock but hasn't a clue what I am whoopee doing about.

Parcel one was my marble top table kit and was expected and very nice.


My second parcel was a raffle prize I won at the Orlando Show.  The organiser sent me a message on during the second day of the show to tell me to go and collect it.  Unfortunately we had left early so I suggested she just re-used it.  She kindly said she would mail it.  A time elapsed.... Turns out she was caught up in her son's wedding.... So I just forgot about it.

This was in my second package


It is in half scale and the detail and workmanship is incredible.  The name on the base is Linda Tulchinsky.  I so wish there was a way to thank her.


It is in a plastic cube


And is three-sided


I will make an album of photos showing every little detail when I get home and put the link here, meanwhile just click on these pictures to enlarge them and just look at this ladies work.  For any one-twelfers the height of the building is just over five inches and the table is about one and a quarter inches high.  That might give you some idea of just how tiny those pots of acrylic paint are, not to mention the pencil.  You may spot an empty cupboard on the right - believe it or not it has actual runners in it and some plastic box/trays which slot in.  They have fallen out in transit and I would like my long-nosed tweezers.... back home .... to help me put them back in place.

Isn't this just the best.


Thursday 8 October 2015

Take a breather

You will probably be relieved to hear this is my last post here until I get back to the UK and am settled back in.  I am reduced to using my ipad because my desk top computer is to be killed and scrapped and I am not fond of mixing iPad and blogging.  

You won't be missing anything; between now and departure any mini related twiddling with consist of gluing and staining fifteen furniture kits.  Even by my reckoning that would be a pretty boring process to follow.

See you in November.  Don't forget about me.

Wednesday 7 October 2015

Cutest video

Go and take a look at the cutest mini video.  I wish I knew how to send it to my blog but never mind this will take you there.


CIL paints


Monday 5 October 2015

Still staining

I am sorry if the staining saga is getting a bit much but I don't have anything else to share and I also want a complete record of my build.  I suspect this is really like watching paint dry...

So far I have given up on Kiwi shoe polish, Danish oil with stain, Minwax Wiping stain and Finish and have returned to plain old wood stain.  The current plan is a two step process of wood stain and Deft semi-gloss spray cellulose lacquer finish.  Haven't got that far yet - spray arriving tomorrow.

Here are two demi-lunes I have stained with Minwax red Mahogany.  They have one coat on them so far - am considering two.  There is very little visible grain showing through which is actually a bonus, I think.  One issue I have with ordinary furniture is that the grain in the wood is way out of scale.  This is why expensive artisan stuff is so expensive.  They spend a lot of time and dollars finding the perfect piece of wood with the perfect grain size so that it all works perfectly in scale.  Obviously if we mere mortals are working with kits or unfinished pieces the wood will not be of that quality so, as I said, I am pretty OK about covering the grain with dark stain or better still paint.

I started in the usual way with this 'experiment' by rubbing down with 400 sand paper and staining one table before assembly and assembling the other before staining....

stained ready to assemble - terrible wood quality on the apron underneath

the other is wood glued and ready to stain

If you are not very good with glue then I would stain first and then build - that way any excess super glue will be a bit shiny but at least they will be stained everywhere.  If you choose the other method and assemble them first, if you apply the wood glue badly, the stain won't take over the excess glue you will end up with bald patches everywhere.

I am OK with glue so I am happy to do either.  It is probably easier to stain and build but just to be awkward I think I am going to spend a couple of days building them (in the kitchen) and then take them en masse (about fifteen of them!!) to the garage and stain them all in one go.  It is a smelly and messy process and I want to do it outside.  

The difficult part about doing it this way is when you have to clean off the excess stain.  After about fifteen minutes you need to clean off any stain that hasn't soaked in and it is hard on these small pieces trying to get in all the nooks and crannies.  Indeed with the pre-build table you saw here I managed to shove a leg off.  

As you can see at the end of the staining process there is no difference between the two if you have applied the glue carefully.


I went over the marble-topped table I had previously stained with Danish Oil with a coat of the Minwax and it looks better for it.  That marble is going to be a pig to mask off when I spray the wood with lacquer.

(I have another one of these on the way and a full size Queen Anne 'bufftet' table with a marble top)


Apologies for camera angle - centre leg is not wonky!

Here is a shot of the two table tops to show you what I mean about wood quality affecting your finish.  Same treatment, material, operator - totally different result.

As in real life it is important not to get bogged down in details.  When finished both of these will look just fine because your eye will primarily be on the vase of flowers or decorative piece standing on them not on the table top itself.  We don't scrutinise, we just take mental snapshots and impressions of things.


I am resisting a second coat, I think it would be too dark.  Opinions welcome.


Thursday 1 October 2015

Back to the Future

A little bit of my past arrived in a carton today.


I am probably the only person who is loving this stuff and I totally understand if you don't feel this is what dollhousing is about but, for some of us it is as much about representing our lifetime as it is about replicating history.  I have no particular preference and I love both.  On this project (after a U-turn earlier in the game) my Georgian is now a 2015 house.

So much for 2015, I go and buy retro 30s, 40s, 50s, 60s etc furniture.


I first saw this Reac furniture for real in a miniature (mostly trains!) shop in Calgary years ago when I had just started with minis and I fell in love with it then.  I have come across it now and then on EBay and when webtrawling since then.  I have finally conceded that it needs to be admitted to one of my projects to pander to my lust, so here it is.


Once I decided I wanted it I spent an age trying firstly to find a vendor and then to find a vendor at a price I could afford.  The average price (if there is one) is probably around £20 - £30 per piece I have seen them as much as $90! and even more.  Eventually I came across a company in Canada (full circle) who claim to be the sole North American importer of Reac (???).  I was thrilled to find they charge $10 or $15 dollars per piece and ordered these.  


I still love them.

The Eames chairs and ottomans (I have two sets) are for the Rec. room.  The rocker, arm chair and sofa could be for there or for the apartment.  I won't know until I come to play with them.  Looking forward to that day.


Saturday 26 September 2015

13 A look at ELF furniture kits


I am sorry this is over-long - never seems like it once I start nattering but certainly does when I come to play back but barring gross errors I don't want to have to do them twice.

Friday 25 September 2015

Back to work - best way to stain and polish a kit

I bet you had forgotten all about the chairs I am experimenting with - ooh, sorry I meant, making.


I left you with one built with wood glue and then stained.  Results:


  • wood glue on clean wood is the best bond for sure
  • any surplus glue won't take stain or paint so you have to be super careful
  • it is difficult with small complex pieces to get the stain in and around all the tiny shapes evenly once it is built.  It is even harder to buff the piece.
The other chair had just been stained with the same stain - Minwax Wiping Stain and Finish - while it was still in pieces.  

On the recommendation of a vendor who said it was what she used, I bought a very particular glue from the Atlanta show called Weldbond which claims to stick any material to anything including glass to glass.  Now this is where you have to be cautious - just because I never took to it is not a reason not to try it.

I had a go with it; indeed several goes.  I could not make it tack up sufficiently to release a piece and certainly not enough to hold parts firm enough to allow me to continue adding another part; so it never got a fair test of strength as it never got to the dry stage.  I am not a person who could join up one piece and leave for an hour or better still overnight as recommended.  I want to get something built once I have started so I need a glue with a fairly quick tack.

Ultimately I returned to Superglue gel.  Results:
  • it will glue stained and painted surfaces together
  • it makes a fast bond to allow you to build the piece
  • it is a strong bond but wouldn't be great on anything being played with as it does 'snap' quite easily
  • any excess will dry shiny but the gel is very controllable and all glue needs the ultimate care when applying
  • I found it much easier to stain and buff the pieces before assembling
I did also try Kiwi brown shoe polish as a stain, again the same vendor recommended it - her work was excellent and she said that was her method.  Maybe it is all about the wood it it going on?  It didn't work well on my test pieces.  Two applications was still a very thin colour and I found it difficult to get it on evenly, slow to do and smelly!

The shoe polish did however 'improve' the finish on my already stained pieces so you may want to consider using a brown shoe polish like a furniture polish.  It evened out and deepened the colour but it didn't give much of a shine.

obviously the foam seats need covering

Here is the correct way to finish the kits:

  • brush on a base stain and wipe off the excess and allow to dry
  • brush on or spray on a sealer and allow six hours to dry
  • go over the furniture with 000 steel wool
  • highlight by applying glaze stain and removing in areas of wear (there is also a more complex method of blending stains and highlighting that you can do at this stage).  allow 24 hours to dry
  • buff the surface until you are happy with the finish and then apply the top coat of varnish or lacquer.  Do two or more coats rubbing down with 000 wire wool in between.
Sadly I am all for shortcuts; my excuse being I will never be able to make/build museum standard pieces so there is no point in frustrating myself trying.  

I will be applying Minwax stain with a brush from a tin or one of their terrific pens. Will probably do two coats, rubbing down in between and adding a coat of satin finish polyurethane varnish to seal and give it a slight sheen.

Wednesday 23 September 2015

So much for my promises


Last post I said - no more purchases....  Unfortunately I am unable to work on any of my furniture kits as we have a few days of realtors coming to view the place.  We are sort of 'interviewing' as we are thinking of selling the condo this trip.  This means I can't have all my clobber parked on the end of the dining table.

So you will just have to suffer another round of 'look what I bought.

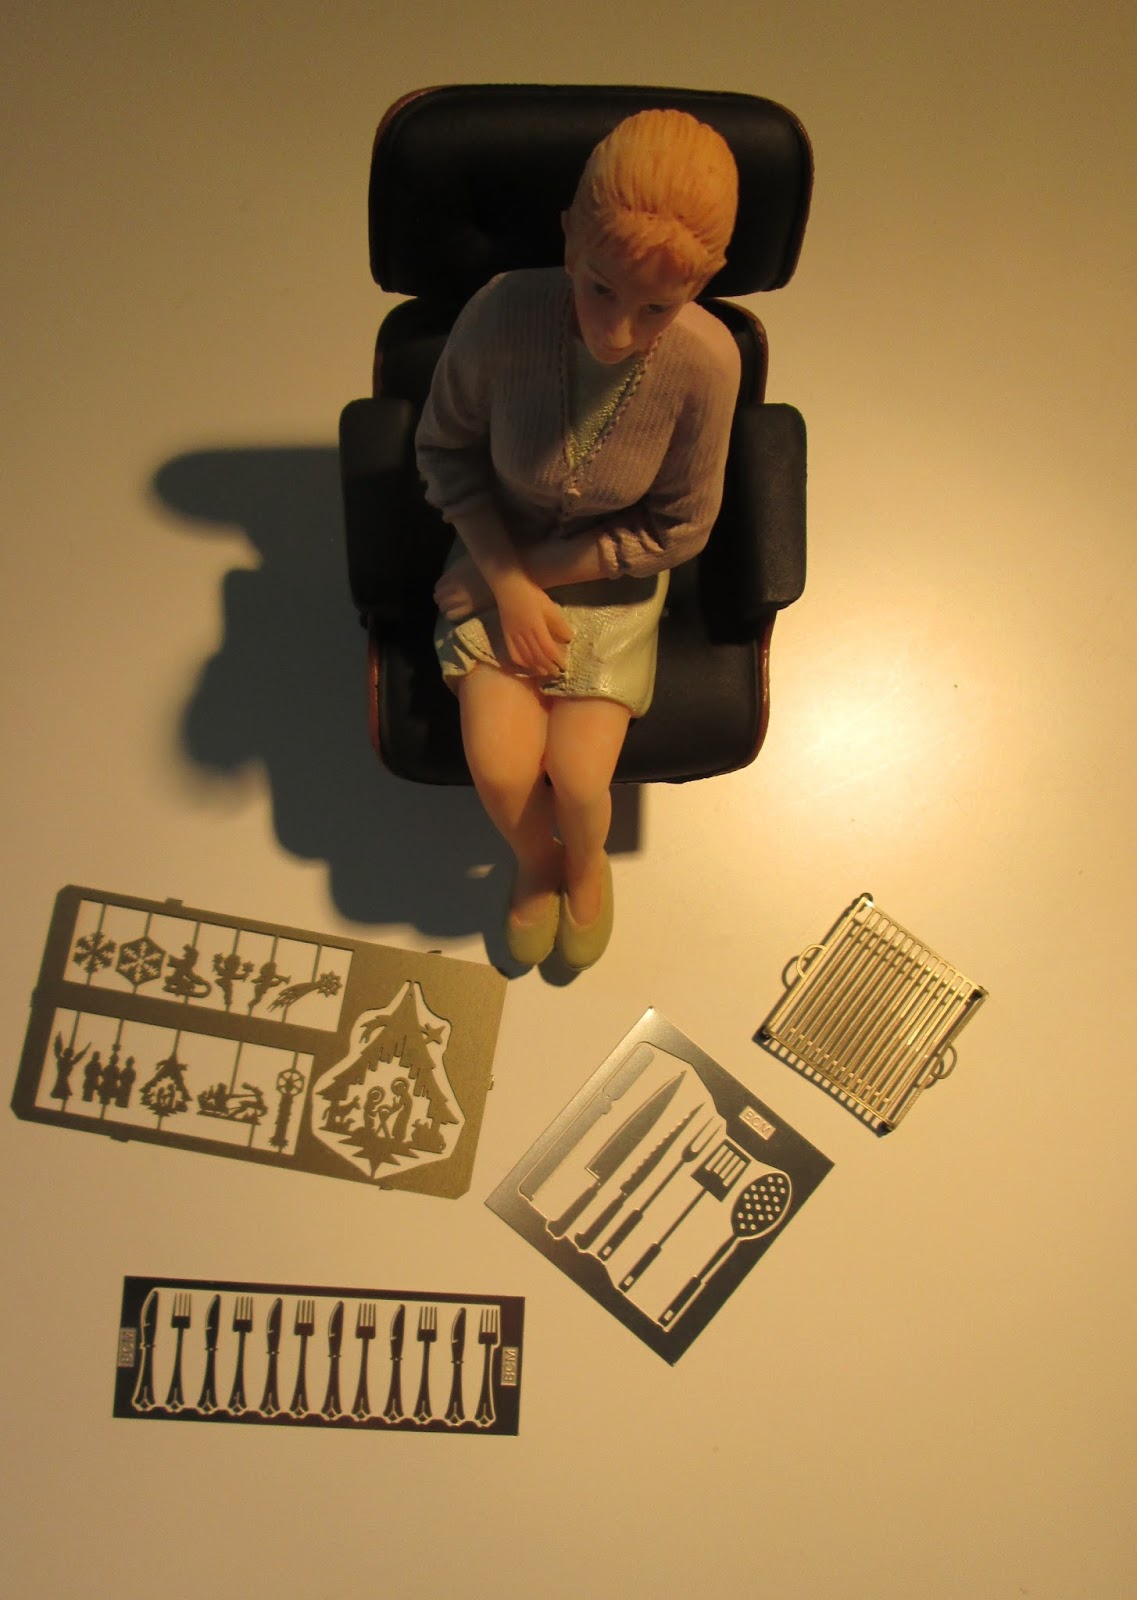
This is what I got from the Atlanta Show.


I saw someone's lovely work and asked her how she finished her furniture.  The reply was she used brown Kiwi polish and a satin polyurethane coat.  She did this on the cut pieces before assembling them.  I asked what glue she used that didn't object to sticking finished pieces together and this was the answer.  It does claim to stick anything to anything including glass to glass!  From Hobby Builders Supply.  You can get a great catalogue from them.


I bought this because I am an eejit.  I thought HO scale was 144th (ish).  I have no idea why I thought I knew such things.  This was to make 'stuff' for Elizabeth's work room.  HO scale is about 1:87 (so roughly half of quarter scale).  If it is any use to anyone let me know and if you want to pay the postage I'll mail it to you.  If you are in the UK I'll mail it when I get back - cheaper.


The scale on these two pieces of fabric is just lovely, both in its weight and also in the pattern.  They are both sagey sort of colours.  The first is from Purple B Emporium (Bradley Meinke) and the second is a Mini Graphics (probably defunct now?) piece which claims to have matching wallpaper and carpet..... somewhere.


Shoes in a metallic sort of green for my Annelise for just £5 and the gorgeous jug of flowers are from my all-time favourite - Clara's Cuties.  I swore I would not buy flowers as I have a ton of materials to make them myself, but..... I came away with three.


A micro geode and a stand to glue it to from Kreative Goodies.  She had a lovely selection and in good scale.


Apologies for not noting the vendor - this was a good buy and I weakened because I loved the pot.


I think I have mentioned before that at most shows I come away with the naughty purchase made when my brain has turned to show-sponge.  On one occasion it was a half-scale house from Toptoise which I ended up having to sell on for a considerable loss just to recoup some of the utterly insane money I had spent on it.  This time it was two pieces from Talley's Turnings.  I just loved his work at the Orlando show, but I resisted;  but the show-god sent him to this one so was clearly trying to tell me something.  The little stoppers come out and fit perfectly, they stand straight as a die and are lovely to touch.  These are turned from some sort of nut.  I am sorry I can't remember what.  I hope I recover from worrying about spending silly money on my hobby and just get to the stage of enjoying them guilt-free.


These were all from the same vendor.  She gave me a receipt, so I thought I had her name but, sadly, there was no name on the receipt.


-------------------------------------------------------------------------------------------------------------------------
If you want to read about the Atlanta Show and find the link to all the goodies at the show:  Dollshouse Trips and Shows  


To read an account of my trip to Atlanta and follow a link to the Botanical Garden photo album:  My Clavering

There will be a published review of the show in Dolls House & Miniature Scene magazine at some time.