Friday 31 July 2015

ELF Miniatures


[If you are following by email, click the (title) heading to go to the blog page to ensure you get all the photos and the links to other items]

Here's my latest purchase from ELF:


Yeah!!!!  I got knobs I like at last

a DHE light but one I like

here comes the table version

TV and unit for the Rec. room


hope to end up like this


computer desk to share in rec room


... ... the dream finish


Tuesday 28 July 2015

Visualising volume

I have no idea if there is any other person out there, besides me, who has no concept of volume but just in case, I thought I would share this.

Some days ago I bought three paint testers to do my wood trims and doors.  The pots are this size:


I reckoned three would do it all.  I did check the label to see how much was in them because I was working out the price of those versus the smallest (large) tin that the paint comes in.  These contain 50ml.

Obviously the price was extortionate per ml compared to a proper tin but it was still false economy to buy the big one when I would never use it any way.  I am not sure now where the break-even point came - I think you could only buy five of these before matching the price of the whopper so I stuck with my three knowing I had 'overpaid' but still hadn't spent the another five pounds (or so?) on paint which would just be chucked away at some point.

I opened them today and this is what 50ml looks like:


....  well under half of the pot!  My other half immediately, of course, said, "Well you didn't think a pot that size was 50ml did you?"  Well, yes, actually, I did.  How am I supposed to know what 50ml looks like?  If I buy a pot or jar of anything I don't expect it to be half full; what's so different about paint?


Monday 27 July 2015

Quality

Thinking again of any newbie that may have found me, you might want to think about the quality of some of things you buy.

Doors and wood trims in particular need consideriation.

This is my fourth build and I have never 'fussed' about these things and bought average stuff at average price.  I suspected almost all are pretty much the same Chinese manufacturer (?).  I had several skirtings left over from previous builds so bought a few more to top them up to save wasting them but luckily I also bought some better quality ones too.  

Like me, there may be a place for the poorer ones in your build; mine are going in the basement rooms, so I would probably would have chosen these any way so they deliberately didn't look that great.

Here are my two very different quality skirting boards:


The top one is the ubiquitous £1 skirting you can buy all over the place.  It is narrower and thinner than the one below.  The routing at the top is minimal but worst of all, the wood is very poor quality.  As I said this never made me fret - after a few coats of paint they look perfectly acceptable in most houses.

If you have a good quality house it deserves the skirting you can see at the bottom of this picture.  Astonishingly it only costs 99p and is leaps and bounds better than the others. Wider, thicker, better routed and lovely quality wood.

It comes from an arm of Dolls House Cottage Workshop called Dolls House Mouldings.  They offer four styles and they are all 99p each.  All their work is lovely quality and I so wish I had bought my house from them!!

Seek them out before buying anything else if you want a lovely finish to your work.  Same price or less than inferior products - it's a no brainer.


If you follow by email

I have just realised that if you 'Follow by email' rather than becoming a follower, you are probably reading the blog post which is embedded in the email.  You are actually getting a much poerer version of the real McCoy.  You need to click on the heading which acts as a link to the actual blog or you won't have access to photo albums or videos or a mass of other stuff. Not to mention that the blog just looks much better!  Obviously the choice is yours but do try clicking on the heading at least once and see if you prefer to read the blog as a fully formed entity rather than just in mail.


This discovery also answer queries from people who tell me they can't see the album link or can't leave comments and various other queries I have had over time and had never been able to resolve.  I hadn't realised they were following the blog from their email.

Saturday 25 July 2015

Sorry its no longer daily

I am sorry I am no longer doing a post every day.  I will post as often as I can.  It is a combination of two things.  Firstly I am doing 'background' work on the project like clearing up my room and hopefully testing out some power tools soon!  Secondly much of what I am actually doing right now for the build itself is the very tedious and time consuming painting of trims and doors ready for when I need them which I am sure you don't need to share.

Now and again though I will be shopping....


Another haul from Jennifers of Walsall netted me some more flooring and trims to complete my builder's list.  I also managed to talk myself up into buying yet more wallpaper.  I hope there are other batty people in this hobby that are useless at buying wallpaper.  (a) I can't find what I want but maybe that's 'cos I don't know what I want (b) I see something I like so I've got to have it, but turns out to be totally inappropriate (c) buying on line gets me paper in all the wrong colours and finishes and even, sometimes, sizes!!  I now have 47 pieces and I am still not sure I am there.


Jackson's 'Birds and Berries'

Brodnax 'Cherry Blossom'

My camera has given them a very wishy-washy appearance.  The pictures on Jennifer's site are much closer.


Birds and Berries is so Arts and Crafts and really not right for this house but I have used it before and love it.  Cherry Blossom could be Regency style and is very light and pretty  so that will probably make the final cut.


PS: By my reckoning I have 79 trims to paint each of them 18 inches long and needing three coats - this means 355.5 feet of painting......  I do love a challenge.....

Thursday 23 July 2015

Glass fibre pencil - EBay - Jewellers tools

Mmmm... not convinced about these yet.  Might be that I am just too impatient.

In the August DH&MS magazine there was a review about a glass fibre brush - £4.95 plus p.p. from the Hobbies catalogue.  It sounded like a useful piece of kit for smoothing things and cleaning things and getting in all those nooks and crannies.  Indeed I had a couple of nooks and a few crannies on a fireplace that I wanted to clean up.

Swift search of the web netted me what looked identical pens this time two for £2.99 and free post.  Forgo a cake this week and they are mine.


looks and works like a propelling pencil

the working part of the pen - glass fibre brush

As the photos show they are like propelling pencils but with glass fibre 'bristles' at the working end.  If you keep them short like this they scrub harder.  You can just lengthen them if you want a softer approach.


I had painted a fireplace to look like a black-leaded one.  Now I am back in 2015 my residents have stripped the original fireplaces back to a shiny sort of pewtery look and added a gas flame-effect fire insert to them.  I tried to remove the acrylic paint but there was a ton still left in various indentations.  I was OK with that as it gave an aged appearance but as I had the magic pen I might as well see what it could do.

before

after

It's not bad and will do fine for my purposes but if you wanted to totally clean it up I think you'd have to put in some time.  This was just under ten minutes of brushing away at it and quite a bit of paint is still there.  It did burnish the metal nicely though and gave me the look I was wanting.


The Jury's out.  I'll let you know if I use them for anything else.

Tuesday 21 July 2015

Jane Harrop - On a small scale....

I received two packages today.  The first was thirty (yes thirty) LED lights which I'll tell you about when I come to tackle them.  The other was this wonderful kit from Jane Harrop.


It arrives in a ziplock bag and plastic box
I wouldn't normally take you through every inch of a kit but I wanted to show you just how perfect her work is.  Firstly the nicely packaged whole.

The (proper glossy) photo on the front isn't just 'window dressing'.

the finished project

Anything you see here will be in the kit and this is the best reference for you all the way through so you can aim to get the finished deal.


'greetings card'

The card goes on to detail what you'll need and gives you an introduction to the kit as a whole.


paper items

There was an envelope containing the paper items you will use to dress the work area.  You could even use the paper to paper the walls, cover the floor and roof tile your mini mini house.  As always there are some preparation instructions for you before you just dive in.  She is all about good prep and working slowly and carefully and finishing properly.


worksheets
The heart of any kit is the instructions; these are just the very best.  They are concise but clear and have a ton of pictures so you can compare your work to her's as you go along.  They are even on separate sheets of paper so if you want to attack the accessories first you don't have to hunt out the 'part that applies' to them.

real size clues

This, for me, is almost an essential in any kit: a piece of paper with real size drawings of all those bits of wood.  I use it it in two ways; firstly I lay out all the pieces to check they are all there and then, of course, I use it to identify the piece I need for each step of the build.


Cut out pieces ready to assemble

Again everything is packaged in appropriate groups and clearly labelled, no guesswork needed.  Take a second to look at the exquisite teeny windows in the dolls house kit. Remember that is a 144th.


tools included

She also includes a right angle jig and some fine grade sandpaper.


The eagle-eyed reader might have spotted there was no work table.  No error on Jane's part. I didn't want one as I am trying to replicate my own work room which means making an Ikea corner table and trolley for these things to go on.

There are great vendors out there who come close and even, maybe, match this quality and detail but certainly not all and people like Jane Harrop define the standard needed.  


Monday 20 July 2015

I am back!

Did you miss me?  Two whole days without a Dalton House dropping into your mail box.

As you'll have gathered I did forward-post some stuff to keep you going but now I am home and ready to start on the project again (hopefully) tomorrow.  Meanwhile you can see some mini stuff over in another of my blogs where I share a visit to Wallington and their dolls house collection.

Dollshouse Trips and Shows


Saturday 18 July 2015

House of Miniatures

This was my eBay arrival for today and was a bargain.


I am sorry if I have mentioned these before.  I talk and write such a lot about minis I have no idea who I said what to; this includes the blogs!

These furniture kits are fabulous.  Lovely wood, beautifully made, finely cut, great instructions and you end up, in this case for example, with two lovely little chairs and you had the fun and pride of 'making' them yourself.  Even more satisfying you will have paid a pittance compared to buying this quality furniture ready done.  This pair cost me £6.50, plus a little stain and varnish (a minute amount of each) and fabric, which I probably already have.  They do come with the blue fabric so you don't even need that.

They are a bit of a mystery to get.  I am fairly sure they went defunct in 1972 but there seems to be a lot still around?  You will find a couple of vendors selling them - as usual check out Jennifers of Walsall but, like me, you can also trawl eBay.  Be careful there as they can be on for some silly prices and many are in the USA eBay site and so cost an even sillier amount to get here, but now and then, a bargain pops up.  I hope I have a stack of them waiting for me in the States via a kind neighbour who has taken them in for me.  A couple of which are really hard to find.

Friday 17 July 2015

The state of the house


So far......

Since changing to 2015 and therefore rethinking the rooms and their uses, I did a stock check on what I had for where and what I might need now.

I sorted all the floors, trims, chimney breasts, fires and fire surrounds and a bit of a sort out of lights.  They are proving to be a pain.  All these items were then dropped in each room as I did a check....... and there they stay.  Off with another shopping list

Right now the basement is the only part actually being worked on.  

From the left - the den (green): this is painted and floors down and soon to have coving and doors in place and skirting boards painted ready for when I want them.  Centre (yellow) room is the utility room: painted and the floor is in process.  On the right is 'my' workroom:  fitted cupboard in place, painted.

On the ground floor left to right will be - dining room, hall, kitchen

First floor: drawing room, library

top floor: students 'flat' sitting room, kitchen and built-in storage cupboards, bedroom.  Her bathroom is across the landing  If I squeeze it in here the rest gets compromised. 

Thursday 16 July 2015

Finishing the pine floor

The flooring being used here is the cheapest of the real wood floor range but, with a bit of a treatment, comes up nicely for a pine floor in a house.


Left side is the naked wood as you buy it; right side is one coat of satin finish varnish.  When it is bone dry de-nib it with one of the fine sanding things I showed you in a previous post.  You must do this with every piece of wood you ever paint or varnish if you want a decent finish.

I then repeated this, i.e. a coat of varnish, an overnight dry, then de-nib.  At the end of that I went over it with my favourite mid-tan shoe polish to soften the colour and to put some 'dirt' between the boards.


Here's the finished job in the children's den.  I can put the doors in place when I have done the floor next door.  I can fit the coving to 'tidy' the ceiling join when I've painted it.  The skirting boards always need to be left until the eleventh hour because sometimes you might want a built-in cupboard or a piece of furniture that you don't want sticking away from the wall and it is a pig (like in real life) hacking out something from that or trying to hack out the skirting for a neat fit.  So just be patient and be sure how much of it you want where.  

Handy tip:  floorboards generally run away from the doors.  Not easy when you have several doors into a room.  Absolutely your choice but I like them this way and I like them running across my house, not front to back.

Wednesday 15 July 2015

Why I no listen?

Wish I listened to me.  I endlessly tell people to make templates when fitting anything to anything.  It is much better than relying on just measuring.  Most of us are rubbish at measuring accurately and drawing lines accurately and cutting out accurately - there's three ways you can be slightly 'off'.  If you make a physical shape and shove it in place successfully you know, if you replicate it carefully, the real thing will then fit.

Having done this for four years and thinking I am a smarty-pants I 'carefully' measured and cut out my first floor section.  Et voila!


The gap was so big that even if I evened it up between the two sides the skirting boards would not cover it!

Even with the added quarter of an inch that I miscalculated you can see that the final adjustment on the template shows how the walls run out of line.  There was no way this would cut as a regular shaped rectangle.


The methodology here is to cut the paper about the right size being sure it is a little over.  Put it squarely in place along two edges and then run your finger nail or something like around the edges to crease where you need to trim.

template fits fine

It is also useful to mark up its orientation before you remove it - astonishing how easy it is to cut part of the floor one way up and another part the other way up, believe me two lefts do not make a whole.


crunch time

The next step is to lay your finished template on your floor material keeping two edges square on - in this case it was the bottom edge and left side.  Draw down the edge you need to cut (the right side).  The other thing you need to do is mark up on the paper where the next piece of floor will start from - that's the pencil line you can see across the top.  You will then lay the template on another piece of flooring and cut out this remaining shape.


Don't forget to mark front edges on the back of the two flooring pieces - again easy to stick on down the wrong way round and then discover the gap.


Two pieces cut to fit properly

Finished job..... well the cutting any way.  I am now off to finish the surface.... decisions, decisions.


These, incidentally, are sheets of real wood flooring from Jennifers of Walsall


Handy tip:  Cut your template and flooring for the largest room first; that way you can use the paper template again for a smaller and then if you are lucky another smaller area, so getting three templates from one piece of paper.  Also, if you do make a hash of the flooring, it gives you a chance to reuse that for a smaller floor.


.

Tuesday 14 July 2015

Little Houses Plus

I am about to show you the very best piece of kit used to wire your house for all its lights and fires.
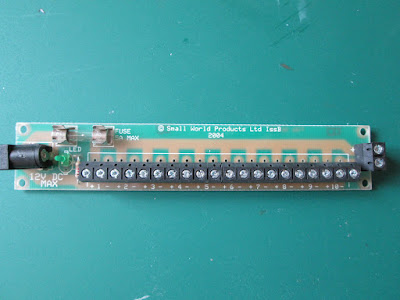

small tidy solution

This handles 85 bulbs and only measures 5.5 inches long by 1 inch wide - probably smaller than the usual ugly white plug socket, gang plank affair you normally find on houses.  You can get even smaller versions so it would be easy to conceal them in different parts of the house in furniture, outhouses, chimneys etc and you could then have totally hidden wiring.  they also come switched.

I am all for simplicity with a house which always has its back to the wall and all my electrics will just run to this block.

This came from a (new to me) vendor called Little Houses Plus and I am so relieved to have found them.

The product is made by Small World Products and I first used it when the lovely man who owned the company sent me one to trial after reading something I wrote about my  frustration removing and, worse still, replacing those wretched little plugs you get on lights and fires. From then on, for me, it was a no-brainer - this is the very best way to light your house.

Sadly I seem unable to order from their site any more although I am convinced I saw them at the York Show?  Happily during all my frustrated trawling for ways of emailing them without a bounce I discovered Little Houses Plus who seem to stock the product and here it is.

For the un-electrical bodies reading this do not be put off by its electricalness.  I totally understand the initial reaction of - I can't do that, I just want a simple plug and socket.  I did exactly the same.  I assure you fiddling around with those blessed plugs and relying on the unreliable commonly found cheaply made white socket gizmo is far more trouble than finding your way round this.  That said, if you are only doing up to half a dozen lights - fair enough go for the cheapest most available option.  I will have something like 40 bulbs (maybe more).  Please note, the number of bulbs is the important factor, not the number of lights.  A chandelier can have six or more bulbs, for example.  
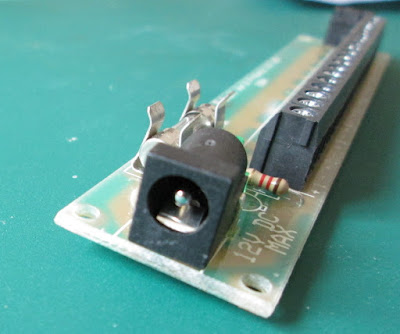
power connector

I would think everyone has seen a connection like this (centre pin socket) on things like transformers for radios, games etc.  This is where your transformer connects by simply pushing it in the socket.  For anyone new to the game the transformer is that big block that you have which has a plug on one end and a connector to fit this on the other. It connects your real house power to your little house wiring and, in effect, reduces the power to mini size.
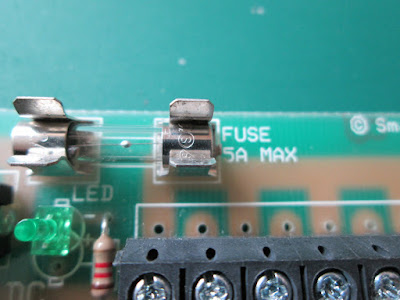
fuse

This might be a bit confusing but it is explained with the instructions you get.  It does say 5A (five amps) next to the fuse so you might think that's what it is..... not so.... it comes fitted with a two amp fuse.  Each amp controls about 14 bulbs so you can work out what fuse you need and what size transformer is needed.  This 2A fuse therefore will control about 28 bulbs.  If, like me you want more it is a simple job to replace this fuse with a 5A fuse.  I would say here that it is tempting to skimp on the lights because it means you can buy a cheaper transformer - they get more expensive the larger the amperage.  Try not to.  It is astounding how many lights and fires you end up wanting.  

Both systems require a transformer.
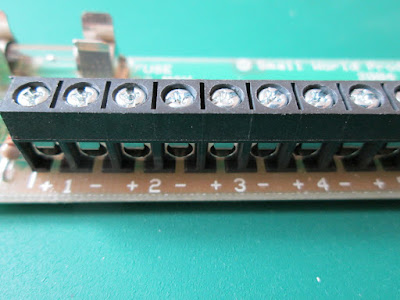
terminals

This is the heart of the machine and what makes it so elegant.  In this photo you can see two terminals for each number marked with a plus and a minus.  For the purposes of our round wire dolls house wiring you don't need to bother with the plus or minus sign.  You simply remove the plug; you can just cut it off if you don't want to mess about removing pins with pliers, teeth and whatever else you can find between the cursing.  You have to do this anyway to thread the wires through the holes you have drilled for them.  Bare the ends of the two wires, scrunch them up a little and put one in each of the holes (under the screws) and screw down the screw to hold it in place.  The board has ten terminals so if you have more than ten lights you simply keep adding them in with others, until you have reached around 85 bulbs.

That is it - you are done - no driving yourself nuts trying to rewire the plugs and adding socket after socket as your collection of lights and fires increase.

If you go back to the original photo you can see the board screws on to the back of your house or wherever you want it positioned.

Love it.

(PS:  I am scheduling posts ahead of myself here to try to keep one a day running for you but I am away for a week soon so there may be a gap.)


PS:  (20/7/15)  Small World Products were on holiday when I was looking for this, so they are still around and have loads of useful lighting stuff and good technical help.  Their email contact  is:  sales@smallworldproducts.com 


Monday 13 July 2015

eBay? - Guilty

I feel a bit guilty about this purchase.  I suppose that's only 'cos I sort of know the maker and I feel I should have bought from her and not from eBay.  In my defense all the lovely stuff I have ever bought from her has gone on to others and some of it by way of eBay when I got rid of all my twelfths.  This included a few radiators!  Also it was only one and I need a ton more.

I did get punished a little as I thought I was getting two.  The photo showed two but the small print (when I checked back today) said there was only one left.


Sunday 12 July 2015

The Saga of knobbing the knob

I am back with not being able to go forward with the build yet again.  I can't put walls in the hall space because I can't fit the doors and that has to be done before gluing the walls in because I can't fit the one at the back of the hall once the walls are in.  I can't fit the doors because I haven't found the knobs I want.

The first episode of the saga was that I couldn't find black Georgian ones so I bought some brass ones and tried painting them.  That didn't work so I ordered white ones as a slightly better option than the brass ones.  Between ordering and receiving them, the house went from 1830 to 2015.  Yippee, I can now have whatever I want.


Firstly you have to imagine the door is white....   I think the brass are too big and the white (on white doors)  are too small - now I think I want nickel or bronze or, or, or, or........

It is take a break time and go to something else before I drive myself and you nuts.

This is a good chance to decorate the hall for the third time.  It has been pale grey and deep yellow and is now about to be half paint and half paper!  

Can you believe I renovated a whole real house and other than a few flits back and forth to the shops with mirrors and minor decorative bits, decisions were sooooo easy.....

Saturday 11 July 2015

Bonkers part two

If you have suffered through the saga of not liking the 'doorsteps' on interior doors .... well here's another thought.

If anyone has the inclination there may be a half way solution to the issue of keeping the pin hinge arrangement on interior doors but getting rid of the 'step' across the bottom.  Someone reminded me that a lot of interior doorways have that threshold plate thingy covering where two different kinds of flooring meet, eg tiles and carpet so a thin strip of wood here is acceptable.

if you look closely at the construction of the 'step' you'll see that there are two things going on - a thin strip of wood for the pin to go in and a thicker piece acting a a stop to prevent the door swinging through the other side.


You could remove the 'step', as I do for painting, and then replace it with a thin strip of wood for the pin to go in, without that step up.  To stop the door swinging through you can just rebate inside the door jamb with the thinnest strip of wood.  I did do this for another reason in another project.  I remade a front door and ended up with a bit of a gap that the wind would have whistled through so I added a rebate.  It was a great idea and the door looked very much more finished with it.  The strip of wood came from a quarter scale vendor so it had a very fine profile.

There is a minor flaw with this plan and that is that you will get a small square gap - gain you can fill this or just live with it.  It is marginally less annoying than the deep step(?)


left side big step, right side thin strip of wood but leaving a gap


Why haven't I done this on this project you might ask;  very simple I didn't think about it until I had finished the door prep and I am not about to buy a whole new set of doors.

The simplest solution to the issue is don't fuss and faff like me and just accept this is a doll's house!  The next solution is to remove the 'step' and just leave your doors closed (stick them in position).  Next solution is the thin strip and rebate idea and after that is the very best of all -  remove the step completely and replace the pins with hinges and add a rebate.

All yours....

Friday 10 July 2015

Doors

I am occupying some time getting doors ready while I wait for a couple of things to arrive to let me get on with what I want to do next.

I doubt it but I really hope if you click on the picture below to enlarge it you can see the difference between one, two and three coats of paint.


from the left one, two, three coats

I have only ever done two coats of paint but as this is intended to be my 'best build to date' project I thought I'd go the whole hog and give the woodwork three coats.  Honestly, in real life, I can see the difference and think it is worth doing.


It is only worth doing if you and the chosen paint can do three thin coats otherwise at this scale it will just look gloppy.  

In my case the thin finish is achieved by using Cuprinol Shades (garden paint!) which soaks into the wood leaving a slight sheen and helped further by rubbing down between each coat to denib the surface,


denibbing

You can then slightly age/dirty the wood with the usual mid-tan shoe polish and a buff or just leave it as is.

I have chosen an off-white colour (Pale Jasmine) so I am happy enough with that as my house will have been fairly recently decorated.

Indeed the hall has been pale grey and then Jasper Cane yellow and I am now stewing on papering it with a Regency stripe.

Thursday 9 July 2015

Sanding

I was just talking to someone about using my new not-a-Dremel for sanding and it occurred to me how much it won't add to what I already do!  I have managed happily for a long time now with the contents of this box as my total sanding equipment:

something else with a permanent home on my work table - the sanding equipment box

Here are the contents in detail...

guess which is the favourite

The battered old sponge covered in very fine sanding paper is four years old and is used all the time so it has done well to get to this point.  I have been trying to find its replacement without success.  The nearest I can get is the white Polar Block and the flat sanding sponges by Diall.  I suspect neither will replace the old favourite - a painter's smoothing sponge..... I so wish I could find another in this super-fine grit.  (The Diall sponges are actually in a drawer, not in my table top box - which speaks volumes)

sanding 'sticks'

I love all the great cosmetic nail thingies you can buy like this one which has seven (!) grades of surfaces.  They wear out fairly fast but are cheap and easy to replace.  It makes a quick reach and is great for knocking off edges and corners.  

Next to them are little sanding sticks in all grades of paper.  Many people love them and I see droves of people picking them up at shows.  They are OK if its the only way you can get in between something fiddly but, in truth, I hardly ever use them.

sort of Abranet??

I have saved another goody until last.  A while ago I had a little kit from Jane Harrop and with it came a small piece of something called Abranet which was just terrific for that very fine finishing you need to do on pieces. It washed afterwards and it went on and on unlike anything dependent on paper.  It is like an abrasive nylon material?  Sadly the piece I had was very tiny and has gone to live with the Borrowers - left it on my table, there one minute, gone the next!

I spent a while considering replacing it but decided I didn't want the large amounts I seemed to find on line and at the prices they charged... Then.... in B & Q one day I spotted this and I think it is very similar, just not quite as flexy as it has a sift fuzzy backing.  I presume the backing is to grip on a tool of some sort.  It does the best of jobs between coats of paint and has washed and dried just fine.

In addition to these things, in a drawer, which is why I forgot to photograph them, I do have ordinary bits of sanding paper in a 400 grit which also works nicely.

As you can see I do seem to have overkill here but as it all goes in a fairly small plastic box on the table so that's fine by me.