Saturday 31 December 2016

Lights - positioning them

In real life we move into a house and arrange our lives/furniture around lights and sockets wherever they are and I suppose there is no reason not to replicate this in small world.  You can simply do as UK builders do and put a ceiling light (pretty much) in the centre of the ceiling and a socket on each wall in the corner and arrange your furniture accordigly.

If you are dealing with a pre-electric house this won't prove so simple and you will need to consider where you want chandelier, wall lights, candles or lamps on furniture. So there is much to be said for collecting loads of things to go in your house during the building stage.

That way you will know exactly what you need to wire in where.

I long ago gave up on being that organised and I am lucky if I even have any sort of constant idea of how I might want my rooms to look.  


For this 'electric' house I decided anything that was going to be lit would exit the back wall and that was that: so any table lamps (etc) that found themselves at the front of the house after the floor had gone down just won't be lit: otherwise I would be in a permanent state of stasis waiting to find the perfect desk light for the desk at the front of the library for example.  Every level that doesn't have the wiring finished prevents the level above from being worked on.  In my case, waiting for concrete ideas and then shopping for items, would mean the whole house would always be half done.


Even though this is set in 2016 I don't want most of my ceiling lights slap bang centre as they often look offset in some way when the furniture goes in.  


The dining room light for example really needs to be centered over the dining table.  The diary is standing in for how far forward the fireplace will be.  The table and chairs may not be the final ones but they do very well to give me an idea of where the centre of a table might be. 


The hall lantern presented less choices and is just placed centrally.  I suspect they actually were nearer the front door in Georgian houses (?) but it is so dominant it would 'stop your eye'.


I don't have any furniture for the sitting room which makes positioning the light a bit fraught but basically there will be two pieces of furniture either side of the fireplace on the back wall and a pair of sofas lengthwise down the room.  I used some stand-ins even though they are possibly a bit small.  This was still good as it made me realise that I didn't want to count in the first three inches of space (depth into the room) space in front of the door as being part of the seating area.  Therefore the light should go in the centre of the space between the sofas and half way between the fireplace and the right hand door jamb.


All these rooms were simple enough to allow me to just measure from the front of the room, make a mark and then measure from the left hand side and make an intersecting mark. 

If the room is an odd shape for any reason I just make a paper template and use that in the room above to mimic the space.  This has not been necessary on this house so far.


Drill a hole big enough to take the wires where the lines cross.


I like to keep my posts short so ..... see next week for making grooves and then the next week for getting your lights and roses ready and putting them in.

Happy New Year


(24/06/16)


Saturday 24 December 2016

Trims - the sitting room

With the floor in place it was time to tackle the trims.

I like to sort out all trims I am going to need and paint them all in one go.  there is much to be said about cutting them ready to fit before painting; that way you aren't wasting time and paint on the waste which will be cut off at some stage further down the line.  I prefer to just do strips ready in case I make any mistakes working out joins.  That way I know I can cut and re-cut joins if I need to without having to stop and paint a piece of wood.


counted and painted

The coving is painted with white matt paint to match the ceiling as they should be made of plaster.  The wooden trims are painted with white satin.  Everything I use is water based as I hate clean up.


They have at least two coats and are denibbed (lightly sanded) between coats.  I use a decorators sponge and brush the routed grooves with a paintbrush and dust thoroughly with a soft cloth.  if you feel the trims before and after with you hands you will find what a huge difference it makes to the final surface finish to remove the nibs of wood.

denibbing 'kit'


White the second coat dried I put in the fireplace surround and hearth ready for the skirting and dado rail trims.


surround and hearth super-glued in

The door also need it trims in place so I would know where the dado rail and skirting came to.

door all trimmed

I started at the top of the room with the coving.  I found it an absolute nightmare working round the chimney breast, especially as it is such a shallow one.

Don't despair if your joins look like this


some nasty gaps

They just need a little paint shoved into the gaps and all will be well.  this photo is cruel and still makes them look pretty awful I assure you in place they look just fine.


paint-filled gaps


I do exactly the same with all the joins in the room - just blob generous amounts of paint in the gaps to fill the spaces.  Sometimes I also mix paint with sawdust if the gap is a bit too much for just paint.  There are various wood-fillers you could buy but the gaps are so fine and in such a cramped place I can not imagine having to work with them to get a decent result

The trims are all glued on with basic wood glue but I do add a couple of blobs of gel superglue just to grip them in place while they dry out.


With some fiddling of this and that around the fireplace and it was done.  Not thrilled with the skirting around the fireplace and I will need to give it more thought on the next room before cracking on with it.

Meanwhile one sitting room waiting for its light(s?).


Merry Christmas.


(22/05/16)


Saturday 17 December 2016

Floors - Sitting Room

I am sure I must have covered floors (accidental pun!) several times in my posts but I am conscious that not everyone finding a blog has the time or patience to back up and read previous posts; so, for them, and as my own record of the build, here's a brief look at the floor going down in the sitting room.  [If you do want finer details of how-to just click on the floors link in the left hand column and every time I've mentioned a floor, the post should be there.]

For this room and probably all of the remaining rooms I am using my very favourite flooring.  This is real walnut laid in perfect scale strips on a backing paper.  Mine comes from the States via Jennifers of Walsall so I know you can get it on both sides of the pond.  It is absolutely the best quality I have found for real wood flooring.


the best real wood flooring


First of all I make a template of the floor using real life wallpaper.  Make as many as it takes until you get a perfect fit.  Don't compromise or you will end up with problems later.


paper template and the cut floor being tested


Using the template I cut out the floor.  Be careful about making sure you lay the template the right way up on your flooring; it is too easy to flip the shape of the room and then nothing fits and you have wasted a (not-cheap) piece of flooring.  I always turn my flooring over face side down and then lay the template on top of that also face side down, mark up round the edges, and if there is no identifying cut out, for a fireplace for example, I also write which is the top right hand corner, so it doesn't get rotated when I put it in place.

The flooring is in two sections as this is a deep roomed dolls house.  I always start with the full depth of the flooring being used for the front section of the room.  This puts the join as far back into the room as I can get it, so if there is any issue with the join its not as visible from the front of the house.

The floor is then given two coats of water based, quick drying clear satin varnish.  You can choose a range of methods to finish the wood.  You may just want to leave it as it is but you won't get the lovely colour and grain of the wood.  You could just use use a couple of coats of clear wax polish, or a gloss varnish if you want a high shine or do a proper three or four stage wood finish - the choice is entirely yours depending on your skill and the required finish.  This couple of coats of varnish is fine for me.  Don't over-wet the piece, remember it is wood and wood and water are not happy companions.  After the first coat is dry it is best to rub down gently with very, very fine sand paper 400 is best 200 up will do; best of all use a painters sponge that is designed for rubbing down paint between coats.

Remove all the sanding dust carefully and work on a clean surface and apply the second coat.


first coat done

My floors go down with double-sided sticky tape as I want to be above to remove them should the need arise - repairing/replacing a light in the room below for example.

Only use tape that is as thin as ordinary sellotape otherwise the wooden flooring will stand away from the floor beneath .  I got out all my rolls to see if I could give you a brand name - needless to say they are all blank.  The wide roll is sold as carpet tape but it is very thin for that! They all look chunky here because of the wax paper covering the tape.  I promise you they are as thin, if not thinner, than sellotape when in situ.


very thin double-sided tape

I use a wide strip right across where the join will go and another wide strip along the front edge of the room.  Then I dot bits and bobs around to help hold the floor down nicely.  I don't bother around the walls as the skirting will clamp that down


waiting for the paper to be peeled off

Lay down the front piece first to ensure that the front edge runs perfectly along the exposed front edge of your floor.  Lay the joining piece behind starting at the joint and working away from you.  Use a soft cloth to rub it down in place.

You can of course choose the direction of the floorboards.  In real life they lay in the direction mine do here (across the joists).  Which ever direction you choose it is best that the floors in the whole house 'run' the same way. 

So here it is all done.....


(22/05/16)

Saturday 10 December 2016

Decorating - the sitting room

I know I have done posts (and YouTube) about decorating before, but its worth showing you how I went about decorating the sitting room for those who have just found me.  I will also try to put in the smallest detail in case its something you haven't thought of.


leaning at a jaunty angle

I keep a piece of cardboard, which is three inches deep, to use to mark round the walls wherever I want a dado rail.  This saves endless time trying to measure and mark in awkward spaces.  Simply place it carefully against the wall, firmly planting the bottom edge on the floor and draw along the top edge, then move on.


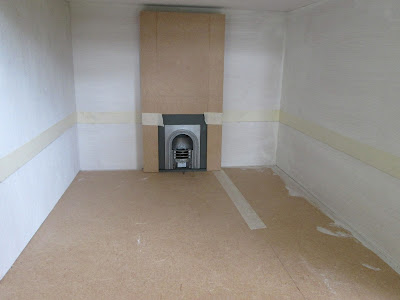
masked ready to paint

I then put masking tape above the line as I am going to paint below the dado rail and paper above it in this room.  Again, a couple of minutes putting on the tape saves many minutes of trying to follow the pencil line spot on.  

Typing this is just occurred to me you could just paint the bottom of the wall first to the approx height of three inches and then mark up for the dado rail height and then paper to the pencil line -  no need to tape - so even more time saved.  Why didn't I think of that!!   I probably would have been rubbish at guessing three inches and gone miles over or under, so its probably OK that I did this extra step.


We all find the materials we like and stick to them.  I am OK about many paints - most are acceptable - but this Chalky emulsion from Craig and Rose is the ultimate in easy.  It doesn't show brush marks, goes on easily, covers well in one coat (I choose to do two) and gives a nice slightly chalky finish.  It would be very hard to beat.


Three walls painted in a couple of minutes, dries quickly allowing you to get the second coat on without waiting ages.  

Handy tip: try to find the optimum moment to pull off masking tape.  Too soon, while paint is very wet, and you risk marking other areas and smudging the edge, too dry and you risk peeling off some of the paint you want to stay behind.  So try to find the moment where the paint is set up/soaked in but not bone dry.


This is a handy tool rather than handy tip.  You can't get rulers in to measure some places in dolls house room and even a fabric dressmakers tape can be a bit thick and unforgiving in corners.  These paper tapes from Ikea are great you can shove them into corners a mark up with a crease if you can't actually read the measurement in situ.  I also just use strips of plain paper to make a template of the width of something and then transfer that to the object without any measuring units ever being involved.  In this case I worked  out my paper needed cutting into six-and-a-half inch wide strips.

Don't fit to the top edge of the wall if coving is going in because it is best to leave some area of wood for the wood to stick to rather than sticking it just on the paper.

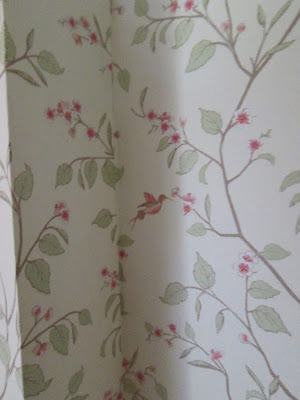
Always keep the top edge of each of the sheets of paper as your top edge and don't trim along that edge, this way any pattern will always be running along the same 'line' right round the room. 

Always begin papering on the back wall.  If you have a chimney begin there.  The first two pieces of paper you will cut will be the left and right side of the chimney breast.

All joins are in the corner unless you have a hugely long room or very short paper (!) Corners are always done in the same way so, depending on the piece of paper you are cutting you need to know if it will be the one which needs a little extra folded edge or whether it just needs straight cut.  It works like this.  

The back wall left and right edges need a small extra folded piece to wrap round on to the side walls and that piece of paper goes in first.  The side walls will have a cut edge and will overlap the little wrapped around edge, so giving a lovely neat corner with no gaps any where.

This room worked this way.....


I began by cutting the left and right side of the chimney breast pieces of wallpaper.  The sides of each of these pieces needed the small added edges.  I put the paper on my board and use the lines as a guide making sure everything is square.  I then rule down with a stylus to get a nice sharp crease.  Your fingernail or handle of scissors will do - just a bit slower as more care is needed.  


click on photo for a better size

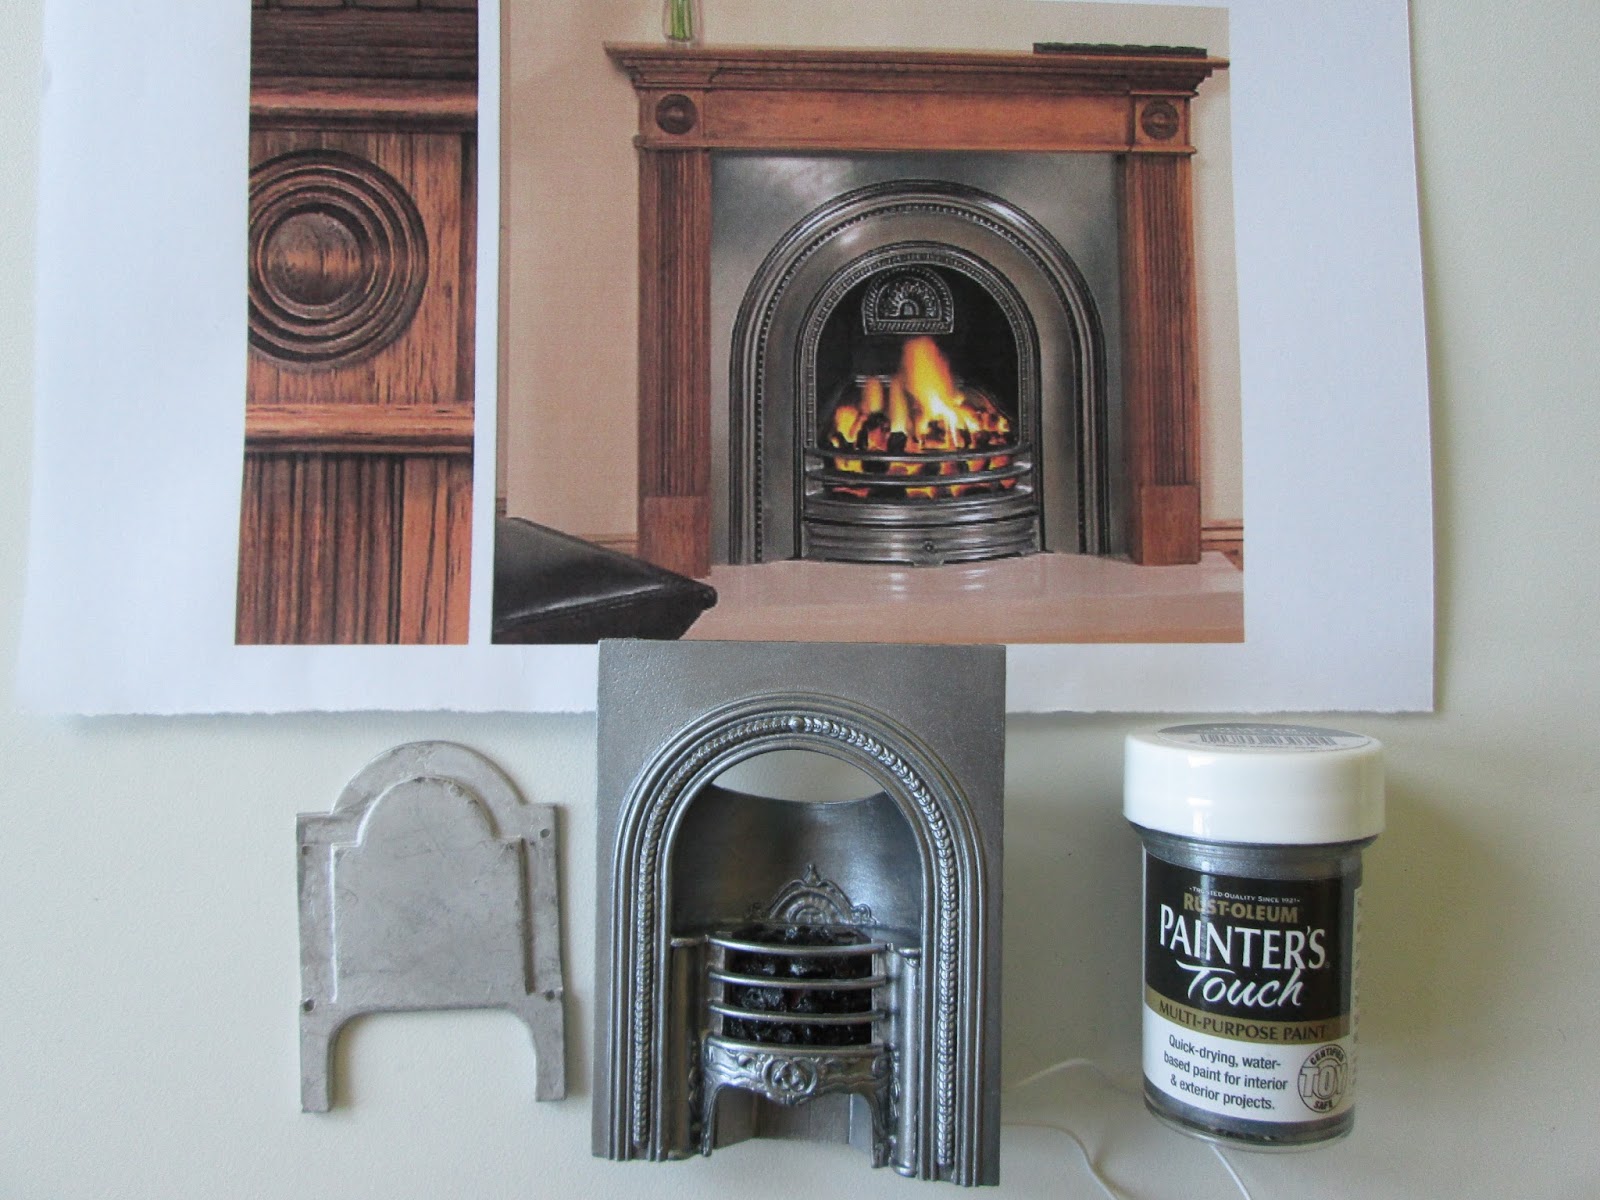
Here is the right hand side 'panel' to go alongside the chimney breast piece.  The chimney piece is simply done by holding the paper to the chimney breast and marking where the creases and cuts come; take the paper away and sharpen the creases and cut to size


Wallpaper paste!  You choose. There is specific paste made for dolls houses, ordinary household wallpaper paste that you mix yourself, general all purpose PVA glue with a little water added and probably many more choices.  I use the cheapest border adhesive I can find and it is perfect.  I suspect it is just a thin PVA but it is silky, lump-free, easy to apply, tacks up at the right speed and does the job perfectly as far as I am concerned.  My current one is called Diall from B & Q but I suspect any will do.

Here you see it is being applied with a spreader; in truth I use my fingers.  I find that much faster and I get a better sense of the thickness of the glue and I can detect the slightest bit of debris, such as a fallen hair (white on white doesn't show!),


This is one occasion where I do practice what I preach.  Keep the glue spreading area clean and wipe it between each piece of paper.  You don't want glue on the front of the next piece of paper that you put there and you don't want any bits of anything on the glue side or you will end up with bumps in your walls.

I put glue on a piece, hang it, wipe over the pasting area with a surface wipe, dry with a soft cloth and then start on the next piece.

again click to enlarge

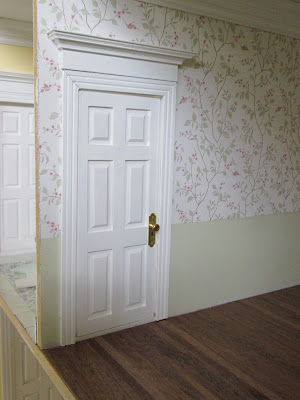
Here's the lovely join at the side of the chimney - it will never be seen but I know its good.

Many people cut papers into each corner with no overlap and many people have annoying gaps in their walls.


I unscrew the hinge and put it back in place when the paper is bone dry.  


Decorating a room at this scale is much faster than one twelfth of real life time.  It took just a few minutes to do this one all ready for floor and trims.

(19//05/16)

Saturday 3 December 2016

Making Fireplace (rewind)

A couple of posts ago I showed you what I was doing to make the fireplace for the sitting room.  At some stage I realised it was overkill and it wouldn't work as well as the simple solution so.... here is how I actually ended up putting this fireplace in place.

Here are the components...


This is a piece of skirting board cut to shape and painted, with the carved side down, to go under the grate to fill in any gap and to raise it to the level of the hearth.


The finished wooden chimney breast assembled and the joints sanded to make it absolutely smooth.


The grate cleaned, lightly buffed and then painted with pewter paint.

A piece of mount-board cut and painted to fill any gaps between the fire grate and the surround.


hole in the back wall for the wires to exit and grey paint for any wall that might show

I drilled a hole in the back wall for the wires to go through and painted the area of the back wall which shows slightly above the grate.


Here is the order of assembly......


The hearth under the grate is glued to the chimney breast.  Check it is flat to the floor.


The gap filler is stuck in place.  Try and get it well centered.


The fireplace is glued in.  I used super glue gel and even clamped it to make sure it lay flat all round.


ready for the vertical

The assembled fire is laid down and the wires are threaded through the wall.  I then used a brush to apply wood glue all round the side and bottom edges that needed sticking in place.


Ta dah!  One fireplace in and two more to go.


(19/05/16) 


Sunday 27 November 2016

Purchases from York Show

I haven't really done a review of the York Show over in my Show Blog as I pretty much said all I could say about it when I wrote about the Spring Show.  I had a nice couple of days away in York but didn't really do very well at the show.  How you interact with a show is very subjective and very dependent on mood I think; sometimes I come away with hoards of good stuff and then, like this one, wonder why I am trawling round.  I am sure the eighty-one vendors had much more to offer.  Here are the sixteen things I bought:

chimney breast kit

I bought this chimney breast kit for two reasons (1) it only cost £5 and (2) it has grooves at the back so you can easily inset the other pieces and keep them nice and vertical.

grooves in the back for side pieces

I am pretty sure I don't need it for this build but I am also pretty sure this probably isn't the last project I'll do (like it is supposed to be).  I wish, I wish, I wish I knew who I bought if from - not much use to me when I need another four!!  All I can do is keep my eyes open in hopes of spotting it again at a fair.  Can't even visualise the stand let alone name it.

leather coat  and scarf/shawl/wrap/whatever

I liked this aviator type leather jacket and scarf for the mud room hooks.  have prised the coat off its hook and rehung it on mine.  Not as easy as it sounded.

for Rec room
Joanne's (95p) shoes to be kicked off in the Rec room like her brothers but only cost pennies.  I got a rack of CDs/DVDs/games - whatever it is that kids have nowadays.  These are Delph's but from another vendor.  The pig has a bit of a story.  I want as many things in this house to have some nudge to my real life with my kids.  I had a large piggy bank for many years - white with daisies painted on  it - always known as Daisy Grunter, so this is an homage to her.
looking for feet

Last month I bought a pair of expensive lamps from Miniatura and one was missing four tiny feet under the bottom plate.  It was sold to me with the instruction to contact the artisan and she would happily send me the feet.  I have emailed her and the vendor to no avail - no response from either!!  Bit peeved I must admit.  I am now on a hunt for gold no hole beads but am reluctant to pay postage on a very low price purchase.  Tee-Pee had no gold no-holes and I didn't find anyone else with any, so bought silver and will paint them.  Also bought some little 'cups' shaped findings in hopes but they are way too big.

mad cat

I once had a lovely cat but sold it with my twelfths and have never seen one as nice since.  As this was all of about a pound I thought it would do for now.  I am a great believer in stand-ins.  I much prefer them to gaps.  I think if I de-pink its inner ears it might even do.


Add caption
Thought the glass cleaner was well made and every cat needs a dish or, in my case, two dishes as I found I already had one!  This discovery gave me a brainwave though - I need to photograph the contents of my house dressing boxes and carry them with me in my 'bragging book' so I don't duplicate stuff.  Visuals are much quicker than an extremely long list.  This show I nearly bought a toaster for example for the loft flat which is not a cheap purchase; luckily I didn't as I spotted I had one of those as well when I got home
tulips and finding

Again the tulips will act as stand-ins until something better comes along.  The silver bowl is a real find in Tee pee's findings.  Nicely engraved outside with a band of flowers and patterned inside too - will look nice when it is filled with fruit or something.

cheap books
These are real shelf-fillers - six books for £1.20 (with pages!) and three other books for £1, scissors 50p for the Rec room cutting out table.

Huge apologies for not noting where I got anything.  I know it is absolutely no help to you if you want any of these things.  All I can say is that nothing is exceptional and if you go to any fair or do a google search you will find these, or similar items, very easily.

I had a strange time at this fair - very unfocused.


Saturday 26 November 2016

Painting a pewter fire grate pewter!


The first fire grate I am using is a register grate.  Most people (including me) would call it a hob grate as it has two hobs either side of the fire, but it also has a back plate - the register - to protect the chimney wall and direct the heat.  These were the first fitted fires!

The hob grates were used right through the house in varying sizes and for different purposes the largest could be used for cooking; the smallest in a bedroom or other small room might just be useful for heating water or curling irons or anything else that we now just plug into a socket to heat up.

A nice middling size such as this would be sold as a parlour grate and it was quite common to keep a small kettle on one of the hobs to make your guests tea and to 'top up' the pot or maybe keep the hot chocolate warm.

Mine is going in Dalton's parlour - though I confess I see it as a modern gas fire copy of the original Georgian which may have been in there.  I don't want poor Eileen to have to haul coals all round the house to light the fires in 2016 so we'll just settle for replicas.  It saves on companion sets, fenders, coal hods and coal.  More the search for suitable ones rather than the cost.

The photo below was the inspiration piece for the finish on all my fires - I didn't want black cast iron as you lose so much detail and I didn't want stainless steel as it is too bright - I like this pewter look.


The fire kits from Phoenix are made in pewter (?).  If you look at the unfinished piece of kit on the left of this photo you can see it is a pale, 'rough', sort of finish.  I bought some fabulous paint from a range of tiny pots called 'Painters Touch' in B & Q and gave the grate a couple of thin coats.  It evens up the surface colour and gives a slight sheen and highlights the patterns in the metal - all round I am very pleased.  

If you go to B & Q, seek out this stand of specialist paints they have some great stuff, metals, chalk paint all kinds of things and in tiny pots you can afford.

Incidentally these metal kits should be glued together using a two part epoxy.  I have done that with previous kits but, this time, I just used a gel superglue and it seems fine.  It isn't something that will be mauled around so I am expecting it to stay together without problems.


Click on the photo to get a screen size version for a better look.


(16/05/16)