Apologies for the non appearance of my blog today .....I sort of knew that was coming....
I am dealing with a load of RL stuff now (as we all do at some time) so the dollhousing keeps dropping to the bottom of my list of things to do..... and then rolling on to tomorrow's list.
I am taking a break for December and will be back with you on the first Saturday in the New year (6 January). Please be kind and stay with me.
Have a lovely Christmas and I wish you and yours a healthy and happy 2018.
Saturday 2 December 2017
Saturday 25 November 2017
The kitchen goes in and grumbling goes on
Let's start with nice! Here are two more pieces for my bedroom from Elf Miniatures. There is a small table to be used as a desk and a bedside cabinet to match the three piece bedroom suite I had already bought. The drawer does open and the finish is lovely.

The desk is to sit in the dormer window space so it was made specially for me so I could have an exact fit.

Bedroom wart: I do wish I had thought to cut the wallpaper so that the trees didn't have their heads chopped off where the wall joins the ceiling.

When the roof is down this is what you will see through the dormer window.
-------------------------------------------------------------------------------------------------------------------------
Let's wart away in the kitchen.

I tried to improve the tiles by adding a thin card paper trim down the side as they would have a trim in real life. I also coated them with a triple thick glaze which is something of a pain to apply to a large area. I do commend it to you if you have a clock face or something like that which you would like to have the appearance of being covered in glass. It works really well and even gives that nice domed effect that clock glass has. It works best by dropping a generous amount into a space and letting it settle

The tiles were them re-scored carefully and I kidded myself they looked better for it and they were put in place.

The left side of the kitchen is a double wart wall.
Wart number one: Why, oh why after making the boob of putting in trim in the bedroom and then realising I should have put the false door in first did I then go on to trim the kitchen and then add the extractor fan! I didn't even realise it until everything was in place and then the penny dropped the extractor does not go to the ceiling it only goes to the coving!!!!!!!! I can''t face removing and fixing right now so there it will stay for a while.
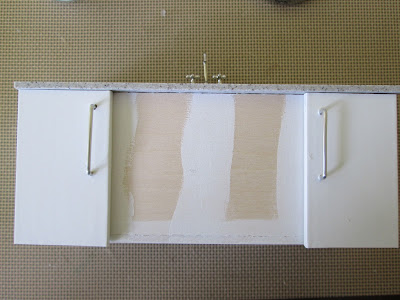
Wart number two: the tiles most decidedly need to go up to the fan and not just be a strip along the worktop.

Can you now spot wart three which resides on the right hand side of the kitchen?....yup, I stopped the tiles below the cupboards again and it looks odd. I now have the job of having to fit some perfectly between the shelves - such fun, not!

Wart four is really more of a giant carbuncle which will be really hard for me to ignore. If I have a particular feature or something I am fond of, like a a really nice fireplace or piece of furniture I learned very early in my dollhousing life to make sure it got placed pretty much back and centre of a room, so it could be admired by the large human. Here I have made some lovely Elf units and terrific sink and cooker and microwave and wonderful resin counter tops and then carefully slid them all in sideways in a pokey room on the rooftop floor which is hard to see any way, so they are now pretty much unviewable.
Here endeth the lesson for this week Think and plan, think and plan.
-----------------------------------------------------------------------------------------------------------------------
I have mentioned many times that my blog appears regularly each week on Saturday because I do a bit of work on the house and then write about it, so in a good week with lots of bits being done I might get two or three posts written and banked. I have had as much as three months worth waiting to appear. Sadly RL stuff has been getting in the way of late and so I am now all out of work and writing. I will do my very best to get something done on the house next week and get a post to you on time and make it a happy one. I just thought I would add a footnote in case Saturday came along and I didn't appear.
Thank you to all who comment here and to those who also email me. It is always lovely to hear from you and to know my mini passions are also enjoyed at some level by others. Basically it is lovely to share with such gentle souls.
Saturday 18 November 2017
A couple of purchases and starting fitting the kitchen
I have spent literally months trying to find a light with a fan like I have in the Rec room. They don't turn up often and when they do they seem to be on American sites (Ebay included) this means the cost has been well over the twenty pound mark and as much as about forty pounds. I wanted it but not that much.
One iPad and settee night I went on the usual trawl and for some astonishing reason found this on Maple Street Dolls House and Miniatures. It is a site I sort of know but for some reason had never pinged in my searches before as having 'a light with fan'. Not only did they have one but it was only £5.39 plus postage and came in a couple of days. Whoops of happy could be heard in the land. I am sharing this in case they have something you thought you couldn't find??????
It looks huge here but that's just a perspective thing, the scale is fine.

The entrance to the flat is of course an interior door in the house but it would still need a (privacy) lock. I thought a straightforward key lock would do rather than a Yale like we have on the front door of the house. I started with brass escutcheon, covered it with silver pen, snipped out and super-glued it on the door.
I spent a lot of money getting the wallpaper for the sitting room and the tiles for the kitchen all the way from Australia and now I don't like it. I was expecting flat mat wallpaper and a gloss card (maybe even embossed) printed tile. I received all the same A3 size glossy paper for both. I don't want shiny wallpaper and I do want thicker and embossed tiling.
I tried scoring a strip of the tiles to emboss it a little. The strip on top has been scored by me but it doesn't look substantially different to the flat piece underneath - so that's not the answer.
One iPad and settee night I went on the usual trawl and for some astonishing reason found this on Maple Street Dolls House and Miniatures. It is a site I sort of know but for some reason had never pinged in my searches before as having 'a light with fan'. Not only did they have one but it was only £5.39 plus postage and came in a couple of days. Whoops of happy could be heard in the land. I am sharing this in case they have something you thought you couldn't find??????
It looks huge here but that's just a perspective thing, the scale is fine.

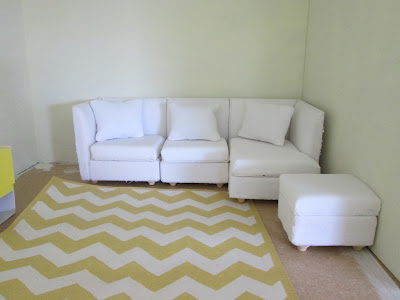
Another very considered purchase was this not too lovely corner sofa. I knew it was low quality but it is the size and shape I want. I had already looked at tons of mini sectional sofas all at daft prices and they would definitely need recovering and were mostly too big for my apartment space.
I have already bought several very nice (expensive for me) retro pieces of furniture for this room but when I put them in place they looked far too OTT for a (mature) student flat. My landlady is not that generous. That said, a white corner sofa might still suggest a case of style over substance. Not at all practical. So, it may end up being recovered charcoal grey especially if I can't tidy up the bits and bobs that need doing. Think it also needs better/taller legs. It is covered in a very, very thin velvet like material, so there are a ton of loose bits. I am hoping a soft brush and some fray stop may improve it. You can find it in several places but my favourite vendor had it cheaper than anyone else and it was here the next day, good old Elf miniatures

----------------------------------------------------------------------------------------------------------------
Off we go on the process of getting the kitchen units in place.
 |
| trims painted and ready to go |
 |
| floors - two coats of satin varnish rubbed down before and in between |
 |
| wallpaper template of kitchen floor |
 |
| double sided sticky tape ready |
 |
| kitchen and sitting room floor laid down |
 |
| this is why I always use coving - I hate those gaps |
 |
| I needed a silver escutcheon for front door lock. |
The entrance to the flat is of course an interior door in the house but it would still need a (privacy) lock. I thought a straightforward key lock would do rather than a Yale like we have on the front door of the house. I started with brass escutcheon, covered it with silver pen, snipped out and super-glued it on the door.
 |
| coving in, door in, floor in, ready for units |
 |
| sad face |
 |

In real life I never have tiles in the kitchen - I can never find ones I want to live with for years and can never decide where to stop and start them - guess what - I am having just the same issues in small world.
I show you how it all turned out next week.
Glum mini person......
Saturday 11 November 2017
The not-much-fun bedroom
For some reason this apartment bedroom seemed to be a pig of problem from start to finish.
First of all there were six pairs of LED lights wires lying across the floor from the ceiling below. They each had the neck of the fitting slightly protruding above the floor. Rather than making six deep grooves to get the wires and neck laid down properly I worked out a different tactic - a false floor.
I bought some 1/8th inch strips of wood from Hobby's and used them like joists. I put a strip right round the edge of the room, laid three inside this frame front to back and put in the occasional strip across (for additional support) where the wires would allow. On top of this I glued a sheet of cardboard (thin but fairly rigid) for the new floor.
So all that worked out reasonably OK and I photographed each step of the way for this how-to-do-it post - then I wiped the card in the camera thinking I had downloaded the photos - I hadn't.
Here is the finished front edge - now that's a useful tutorial.
I used a knife with a broad edged blade like a chisel and hacked away at the wood. It took absolutely ages. I thought that levering the whole piece of skirting out to cut out the piece would make such a mess of the wallpaper and the adjoining skirting so I wasn't prepared to risk it. Finally I had hacked through to the back wall in both places and I levered out the door size section using a small screwdriver - out popped the whole skirting clean as a whistle. Fortunately there was no collateral damage other than some wallpaper torn and the door would cover that any way!! So I removed the piece and duly glued the two sections back in again.
In went the door into the newly created space.....
Here is the furniture I have so far for this room. There will be a small matching side table and a plain small table to fit in the dormer window space for a desk and a chair for that. The wardrobe and drawers do open. Unlike some mini friends I may resist the temptation to fill them.....I love the idea but not the cost. It would be a delight for anyone 'playing' with the finished house to discover such things but, sadly, that won't happen. I have never kept a house to 'play' with. I really like the making and moving on. That said, this one was meant to be my first keeper, so you never know.

First of all there were six pairs of LED lights wires lying across the floor from the ceiling below. They each had the neck of the fitting slightly protruding above the floor. Rather than making six deep grooves to get the wires and neck laid down properly I worked out a different tactic - a false floor.
I bought some 1/8th inch strips of wood from Hobby's and used them like joists. I put a strip right round the edge of the room, laid three inside this frame front to back and put in the occasional strip across (for additional support) where the wires would allow. On top of this I glued a sheet of cardboard (thin but fairly rigid) for the new floor.
So all that worked out reasonably OK and I photographed each step of the way for this how-to-do-it post - then I wiped the card in the camera thinking I had downloaded the photos - I hadn't.
Here is the finished front edge - now that's a useful tutorial.
 |
| the edge of the false floor |
I then wallpapered and added the usual coving but held off on the skirting. Much ifs and ands and buts went into the decision to put carpet down first and then add the skirting. I like realism and, in real life, carpet certainly goes down after the skirting is in place, but I had the sense to realise that my carpet would fray a good deal and the edges would never go down neatly Any way when I look at my RL fitted carpet it is sort of almost rolled over at the edges to make a neat edge and it looks like the skirting is sitting on top of it.
I have never carpeted a room in a dollshouse - no, I couldn't believe it either. I found it something of a pain to do. The carpet seemed to stretch every which way and cutting it to fit round the door and door frames, trying to make that a nice tidy fit, was a pain; not to mention just getting the front edge to end up exactly in the right place. Once I had got the front edge OK I daubed it with fray stop and gently 'pushed' it into the pile with my finger. It seems to be holding OK so far. I used the usual double sided tape but I only added it as I went along so the fabric didn't catch where I didn't want it to as I worked.
Down went the skirtings. Ta dah - the end?...... not so, I had always planned a door at the back of the room to go to a bathroom. Moral dilemma....... leave everything as it is (no-one else knows there 'should' be a door) or find a way to cut out a piece of the skirting (perfectly) and shove the door in.
 |
| paper and trims all in place |
In went the door into the newly created space.....
 |
| ditto above plus false door |
Here is the furniture I have so far for this room. There will be a small matching side table and a plain small table to fit in the dormer window space for a desk and a chair for that. The wardrobe and drawers do open. Unlike some mini friends I may resist the temptation to fill them.....I love the idea but not the cost. It would be a delight for anyone 'playing' with the finished house to discover such things but, sadly, that won't happen. I have never kept a house to 'play' with. I really like the making and moving on. That said, this one was meant to be my first keeper, so you never know.

(05/10/17)
Saturday 4 November 2017
ELF kitchen, right side
Day four
I'll try and give you some tips (learned by my not doing it right!) in this post which will apply to all sorts of assemblies not just an ELF kitchen kit.
I started today with the fun part and made the stainless steel sink to go under the worktop. This was super easy - basically just build a box and line with metal. The contact adhesive (Bostik's Evostik) is pretty smelly and not the easiest to handle but don't try using another glue. Metal to wood really does need a contact adhesive. Do put a thin coat on both surfaces and wait for them to dry - about five minutes and then press together. When I did the fridge I soon learned that my notion of just adding the glue to the metal side and not waiting very long, really doesn't work well.

When you have covered the surfaces with the film, if there are any teeny, tiny gaps that offend just use my usual method of filling them in with tiny blobs of white paint. This photo is a bit messy as the fill in needs to dry and a bit more trimming needs to be done, but the end result is nigh on perfect.

This photo shows the various stages involved. The boxes are built and everything has one good coat of paint to help the plastic stick - don't miss out this stage - even if the plastic appears to stick OK it will gradually pull away from unprimed wood. Cut a load of strips of plastic ready for covering the sides and fronts as needed and then start wrapping. Trim any excess with a very sharp knife rather than scissors. Take care to remember not to cover any areas which are going to be stuck to something else.

Day five
All the pieces were prepped and ready to assemble.
If you have several doors to space out - do the ones at each edge first and then space the others evenly between.
If you have cupboards above lower units stand them on top of the bottom units and get the upper cupboards lined up perfectly with the ones below, before gluing them in place

Unlike me.... Do not cut any shelf that is going in a space before the space is made, it is very likely to be too big or too small for the finished gap. (How do people like Elizabeth always get theirs spot on?) Even a tiny amount like this means (of course) that you can't fix it in place.

I always make a template from a piece of card for positioning the handles so they all line up and match each other. It is as simple as making a cardboard cutout the same size as the door, positioning the handle on this and marking up where the holes need to go. I then drill a hole through the cardboard and double check before using it on the doors. At this scale the slightest deviation form the vertical (or horizontal) will really shout at you.
The shelf was a change of plan. I had ordered an LED to go over the sink but at the eleventh hour I decided the complications involved in getting the wiring in and, worse, out the back of the house, didn't warrant the effect I would get from it. Also the kitchen is so small it doesn't give any real space to be able to dress it with stuff dotted about so I am happier to have a shelf to put something on.
Tah dah...... the units for the right side of the kitchen are ready.

If you like the wonderful kits that ELF makes don't be nervy about putting them together, the first time will be a bit of a challenge (honestly not much) and then, after that, it is always plain sailing and you will be thrilled at how clever you are and how lovely the kits are.
(09/09/17)
I started today with the fun part and made the stainless steel sink to go under the worktop. This was super easy - basically just build a box and line with metal. The contact adhesive (Bostik's Evostik) is pretty smelly and not the easiest to handle but don't try using another glue. Metal to wood really does need a contact adhesive. Do put a thin coat on both surfaces and wait for them to dry - about five minutes and then press together. When I did the fridge I soon learned that my notion of just adding the glue to the metal side and not waiting very long, really doesn't work well.

When you have covered the surfaces with the film, if there are any teeny, tiny gaps that offend just use my usual method of filling them in with tiny blobs of white paint. This photo is a bit messy as the fill in needs to dry and a bit more trimming needs to be done, but the end result is nigh on perfect.

This photo shows the various stages involved. The boxes are built and everything has one good coat of paint to help the plastic stick - don't miss out this stage - even if the plastic appears to stick OK it will gradually pull away from unprimed wood. Cut a load of strips of plastic ready for covering the sides and fronts as needed and then start wrapping. Trim any excess with a very sharp knife rather than scissors. Take care to remember not to cover any areas which are going to be stuck to something else.

Day five
All the pieces were prepped and ready to assemble.
If you have several doors to space out - do the ones at each edge first and then space the others evenly between.

If you have cupboards above lower units stand them on top of the bottom units and get the upper cupboards lined up perfectly with the ones below, before gluing them in place

Unlike me.... Do not cut any shelf that is going in a space before the space is made, it is very likely to be too big or too small for the finished gap. (How do people like Elizabeth always get theirs spot on?) Even a tiny amount like this means (of course) that you can't fix it in place.

I always make a template from a piece of card for positioning the handles so they all line up and match each other. It is as simple as making a cardboard cutout the same size as the door, positioning the handle on this and marking up where the holes need to go. I then drill a hole through the cardboard and double check before using it on the doors. At this scale the slightest deviation form the vertical (or horizontal) will really shout at you.
The shelf was a change of plan. I had ordered an LED to go over the sink but at the eleventh hour I decided the complications involved in getting the wiring in and, worse, out the back of the house, didn't warrant the effect I would get from it. Also the kitchen is so small it doesn't give any real space to be able to dress it with stuff dotted about so I am happier to have a shelf to put something on.
Tah dah...... the units for the right side of the kitchen are ready.

If you like the wonderful kits that ELF makes don't be nervy about putting them together, the first time will be a bit of a challenge (honestly not much) and then, after that, it is always plain sailing and you will be thrilled at how clever you are and how lovely the kits are.
(09/09/17)
Saturday 28 October 2017
ELF Kitchen, left side
I have written at length about putting ELF kits together so won't do so again here. This is just a fast record of the kitchen units assembly. If you have only just found me and would like really detailed information just click on a couple of links over to the left of this post. Under the Labels heading, choose Furniture kits. If you want to see an ELF kit going together go to My YouTube Videos, again in the left margin, and click on How-to-Videos. You will find it listed there.
In this post, as I said, I thought I would briefly record the process for the diary aspect of this blog (for myself) and as a quick reminder for anyone else and, more importantly, as reassurance for anyone wondering if they could assemble an ELF kit. I am sure the old adage 'if I can do it, anyone can', is absolutely true.
None of the photos are staged for your delectation so I hope they are not too confusing to follow.
Day one. I spent a lot of time just sorting out what the pieces were and how I would approach the work. I clumped together all the stuff that was needed to complete the 8" side of the room and put aside the items I would need to make the 6" inch side. Eazy kits are based on simple boxes with all the doors and drawers and cookers etc added to the front of these. Here, I am making the second of the three boxes this 8" side will need. They were all glued up before lunch in hopes of being dry enough to paint after lunch.... I do have to cook it as well as eat it so there is a longish gap in the middle of the day, Basically this is less than a couple of hours work and much of that was used up giving it a good coat of thinking before I raised a toothpick in anger.
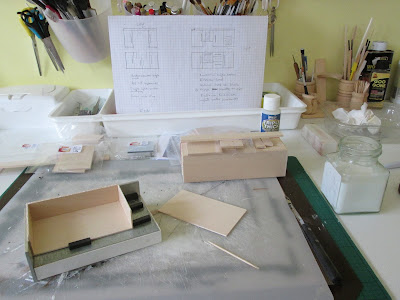
By the end of of my mini working day I had sanded all the pieces and figured out which bits needed no paint, which bits needed one coat of paint and which bits needed three. The final photo shows the kit being left at the second coat stage for a good overnight dry. A final sanding and third coating will be applied tomorrow.


I sanded the piece of steel to round off the handle.

I carefully marked where I wanted the glue (and therefore the handle) to go with the point of a small drill and then put a ruler on the door so I could add the glue and the handle and keep the handle dead straight as it ht the superglue. What you really don't want is any superglue on any of the aluminium surface. Great care is needed.


Et voila - one stainless steel fridge which looks absolutely spiffing in real life. Much less crinkly than it looks here.

After that all the paint was dry and the pieces were sanded and everything that needed to be wrapped in sticky back plastic was wrapped. I am using a plastic gloss finish for the first time. All my previous ELF kits have been painted. I just wanted to try something new.

Day three.
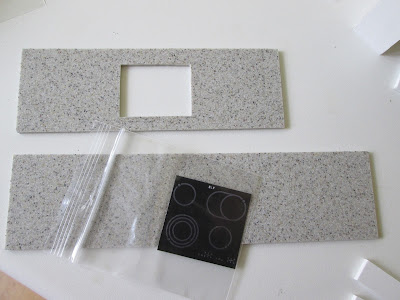
My fabulous worktops arrived. The 'real' granite tops are from the equally fabulous Dollshouse-Flooring.com via ELF Miniatures. To explain..... I wanted to have an underslung sink and didn't know how to cut out the hole for it. Elizabeth from ELF was about to order some things for other projects from Graham at DH Flooring so she suggested she ordered my worktops along with those and she would cut the hole for me. Here they are along with a ceramic hob.
The edges of the tops are polished and the correct corner is rounded off for me. All very subtle in the photo but meaningful to me in situ. Most of all I love Graham's attention to detail.
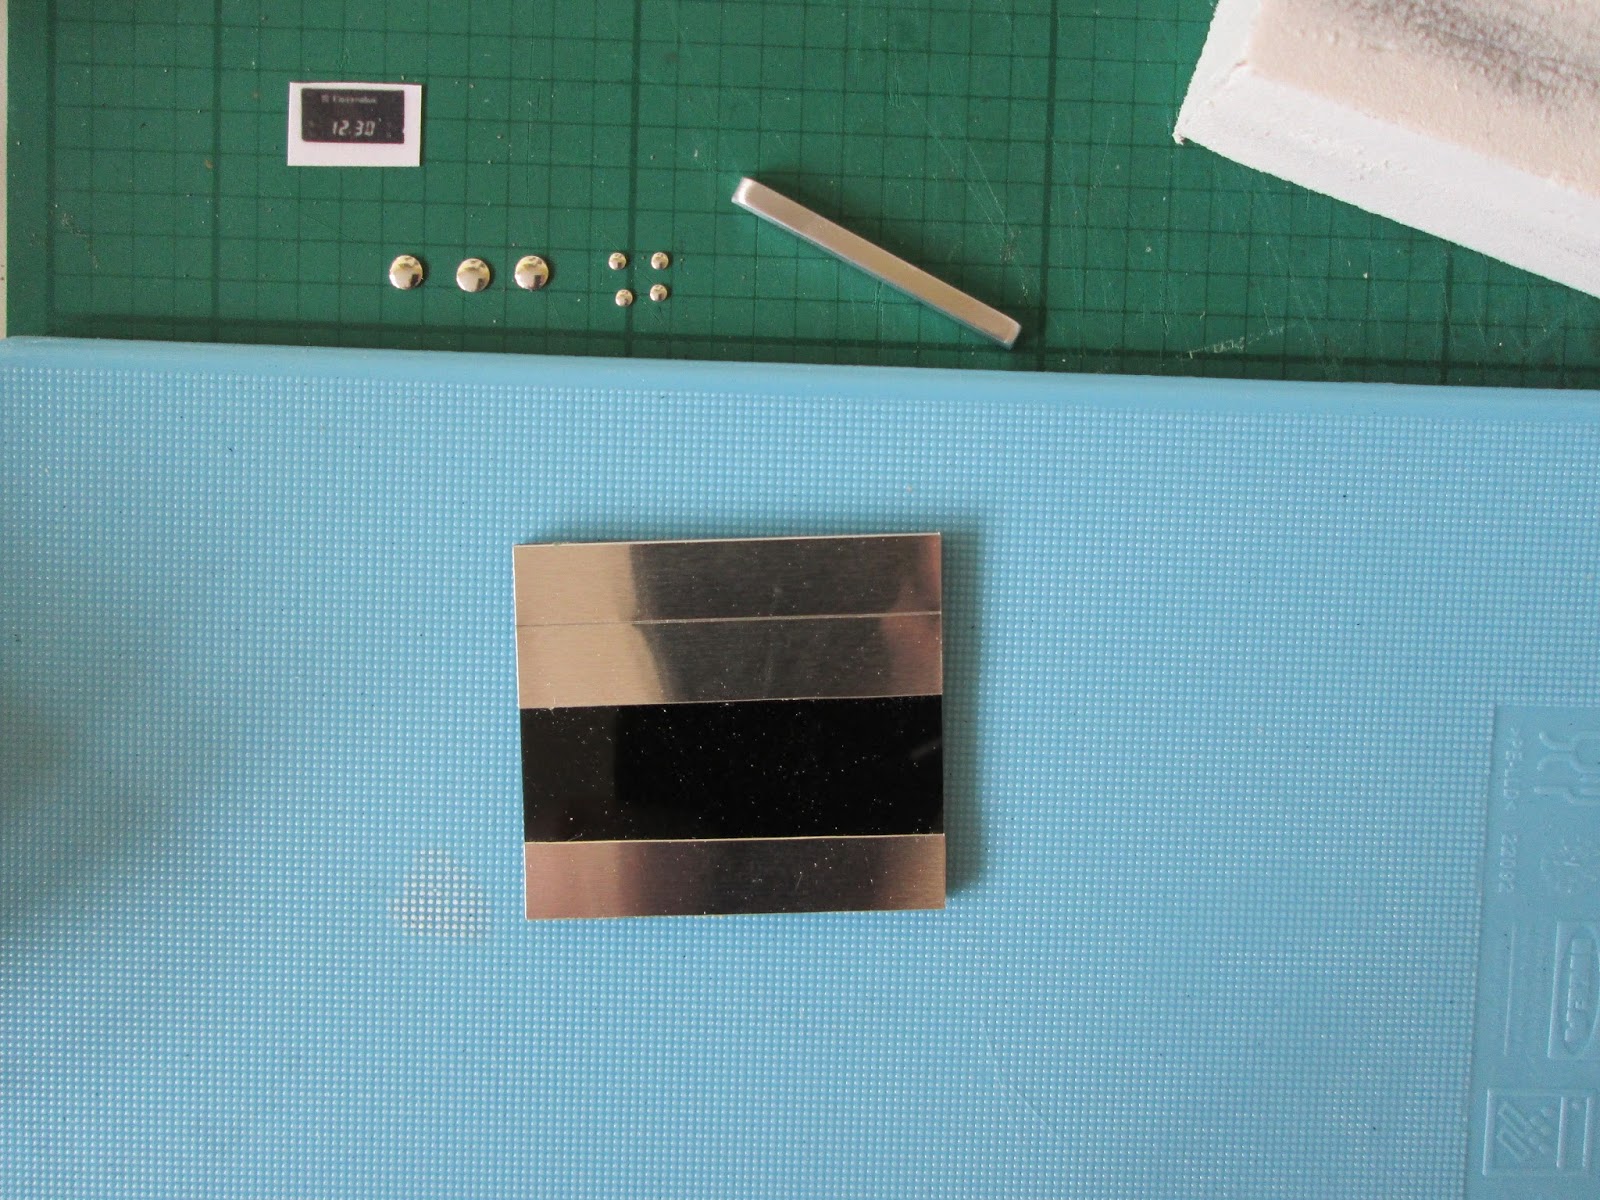
I thoroughly enjoyed putting the oven kit together.

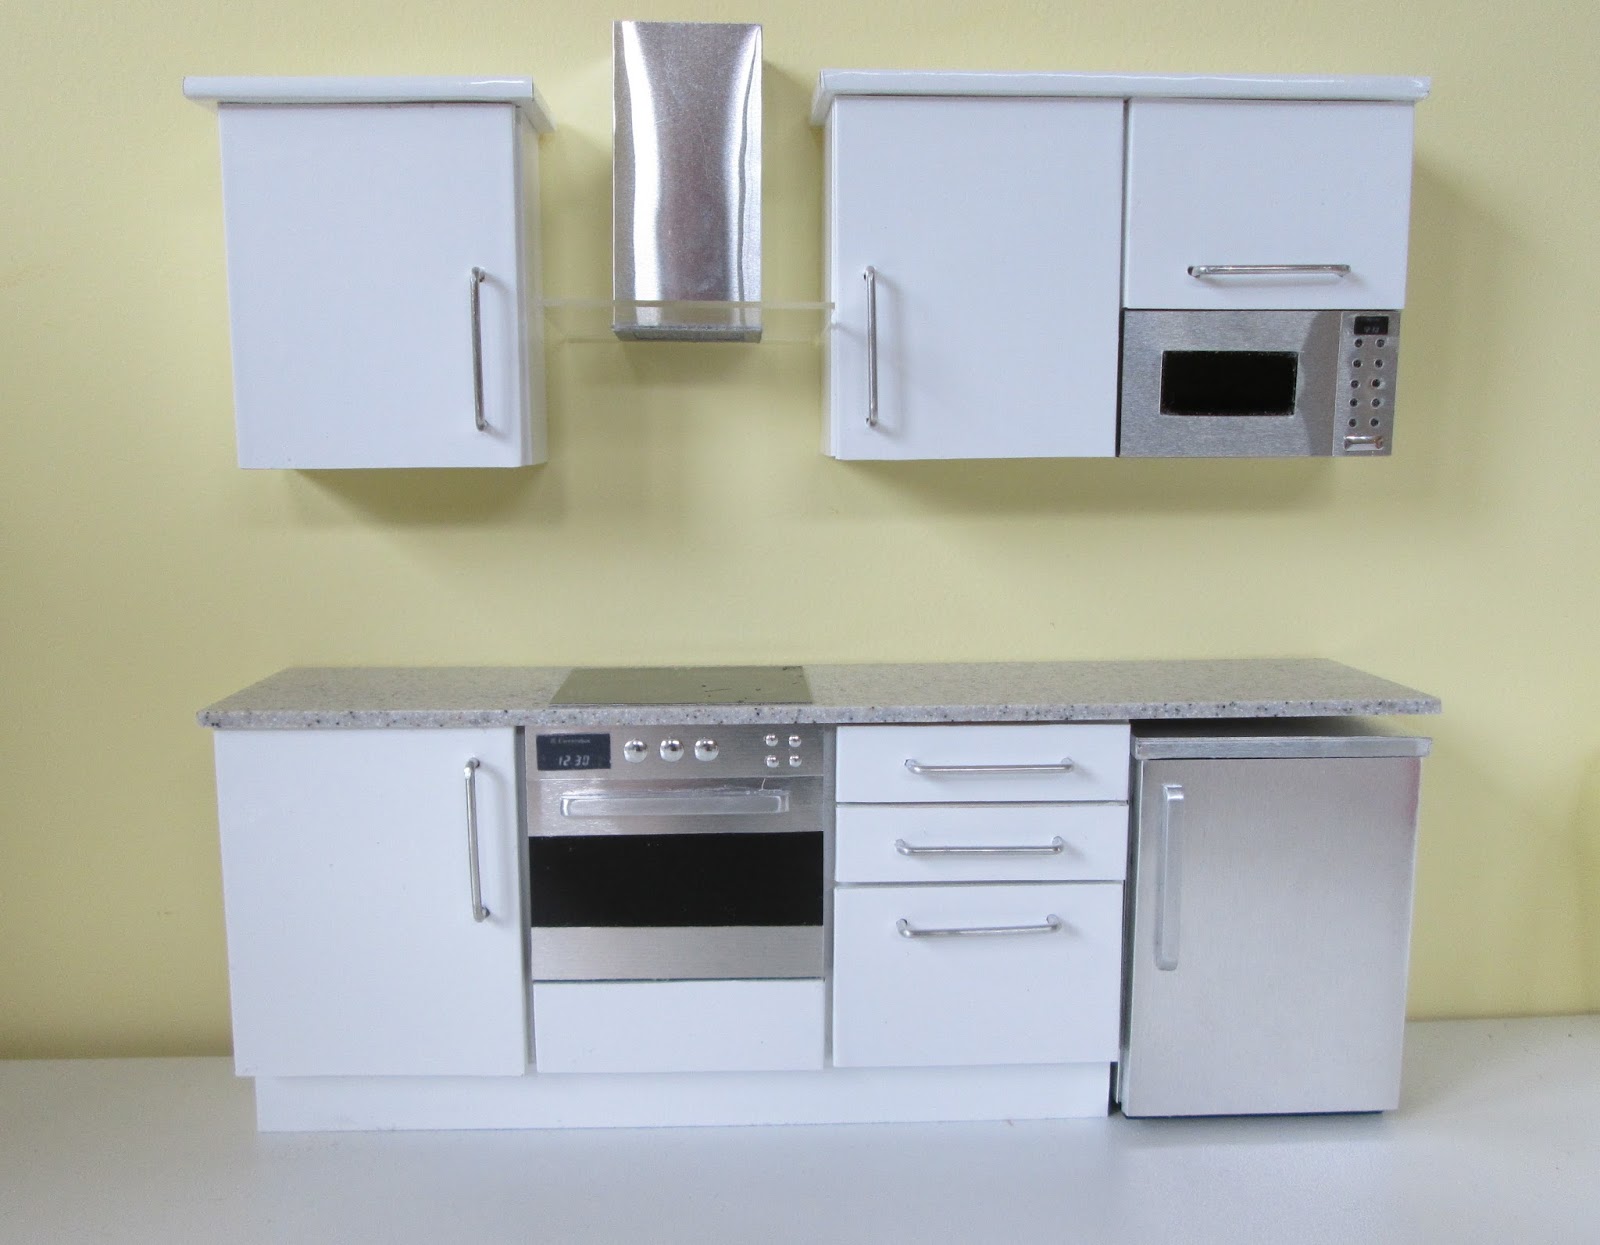
Then I made the cooker hood. The lovely realistic filter is just a piece of mesh from ELf and a bit of white card (my own) cut to shape. The instructions suggest it is spray painted with silver paint. I don't have tons of stuff like that to hand but I discovered that my trusty silver pen did a great job. Bit of a trim around the edges and it was good to go.

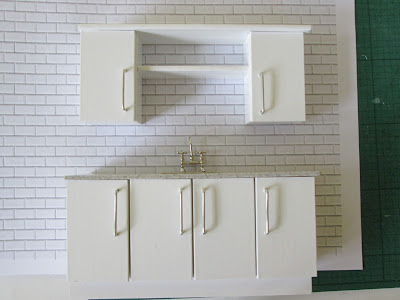
By the end of the third day I had one side of the kitchen done
The background is my worktop and hive wall; the kitchen is not in place in the house yet.
You may have noticed I weakened and added handles to my original plan of sleek no handle cupboards - they just sort of looked unfinished????
(08/09/17)
In this post, as I said, I thought I would briefly record the process for the diary aspect of this blog (for myself) and as a quick reminder for anyone else and, more importantly, as reassurance for anyone wondering if they could assemble an ELF kit. I am sure the old adage 'if I can do it, anyone can', is absolutely true.
None of the photos are staged for your delectation so I hope they are not too confusing to follow.
Day one. I spent a lot of time just sorting out what the pieces were and how I would approach the work. I clumped together all the stuff that was needed to complete the 8" side of the room and put aside the items I would need to make the 6" inch side. Eazy kits are based on simple boxes with all the doors and drawers and cookers etc added to the front of these. Here, I am making the second of the three boxes this 8" side will need. They were all glued up before lunch in hopes of being dry enough to paint after lunch.... I do have to cook it as well as eat it so there is a longish gap in the middle of the day, Basically this is less than a couple of hours work and much of that was used up giving it a good coat of thinking before I raised a toothpick in anger.


Day two. Today began with my adding a third coat of paint to the edges of various pieces and a couple of other places to ensure a perfect finish anywhere where the paint might be seen. I should mention the other paint is just to make a good base for the sticky back plastic film to stick to.
While this was drying I made up the under-counter fridge kit, beginning with the usual box building.

I sanded the piece of steel to round off the handle.

I carefully marked where I wanted the glue (and therefore the handle) to go with the point of a small drill and then put a ruler on the door so I could add the glue and the handle and keep the handle dead straight as it ht the superglue. What you really don't want is any superglue on any of the aluminium surface. Great care is needed.


Et voila - one stainless steel fridge which looks absolutely spiffing in real life. Much less crinkly than it looks here.

After that all the paint was dry and the pieces were sanded and everything that needed to be wrapped in sticky back plastic was wrapped. I am using a plastic gloss finish for the first time. All my previous ELF kits have been painted. I just wanted to try something new.

My fabulous worktops arrived. The 'real' granite tops are from the equally fabulous Dollshouse-Flooring.com via ELF Miniatures. To explain..... I wanted to have an underslung sink and didn't know how to cut out the hole for it. Elizabeth from ELF was about to order some things for other projects from Graham at DH Flooring so she suggested she ordered my worktops along with those and she would cut the hole for me. Here they are along with a ceramic hob.
The edges of the tops are polished and the correct corner is rounded off for me. All very subtle in the photo but meaningful to me in situ. Most of all I love Graham's attention to detail.

I thoroughly enjoyed putting the oven kit together.
 |
| The black glass with the two strips of aluminium glued in place |

Then I made the cooker hood. The lovely realistic filter is just a piece of mesh from ELf and a bit of white card (my own) cut to shape. The instructions suggest it is spray painted with silver paint. I don't have tons of stuff like that to hand but I discovered that my trusty silver pen did a great job. Bit of a trim around the edges and it was good to go.

By the end of the third day I had one side of the kitchen done
 |
| the hood is not curved it is just catching the light that way |
The background is my worktop and hive wall; the kitchen is not in place in the house yet.
You may have noticed I weakened and added handles to my original plan of sleek no handle cupboards - they just sort of looked unfinished????
(08/09/17)
Saturday 21 October 2017
A Hunt Board for the Dining Room
A hunt-board is very similar to a sideboard but is generally taller, smaller and a simple design. I think nowadays no-one is bothered what we call what, so most of the furniture names have become interchangeable but if you want to be pedantic, like me, 'sideboard' pieces should have different names depending on their shape and size and use and historical beginnings. So a sideboard, credenza, buffet and huntboard are different creatures.
The reason for its name is that it was traditionally used to hold the hunt breakfast. It therefore needed to be a light piece of furniture to move it easily to where it was required and to be taller than a table as people would be serving themselves from the dishes laid out on it. It went on to remain in domestic dining rooms and would hold breakfast items in their chafing dishes for the same reasons.
This is the kit I bought....

This is the inspiration piece - which just confirms the house of miniatures version really

 |
 |
 |
 |
 |
This sanding produces the best sort of sawdust to add to paint to fill gaps in your coving and skirting joins, et al. Tap it onto a piece of paper from the sandpaper so you can then 'funnel' it easily into a small container.
 |
 |
 |
When I added the varnish everything went to pot! It dragged at the stain and went gloppy in places. I had to go back over the piece in an attempt to correct the problems. The large drawer front had to be sanded right back to basics and started again. I don't have any explanation as to why this happened. The photo below is to show you just how tiny the knobs and plates are for these drawers (small brass tacks and washers. There are no spares and are so, so easy to lose. Always work over an uncluttered work-space (no where near the edge) so if you drop one you can find it again. I started by holding the work over my lap as I usually do for comfort and a good sight of what I am doing. I then dropped the nail and washer as I was trying to attach it to the drawer and spent a very, very long time finding them again and even then that was more by luck than anything else.  There is a template for marking up the position of the knobs which is useful. You cut it out and place it accurately on the drawer front and mark up for the pins.  Mark up and drill the holes with a very fine drill bit - smaller than the pins. Add a very tiny bit of superglue gel into the hole and put the pin and washer in place and press the washer down with the tweezers until you are sure it has stuck. Then gently tap the pins in with a hammer leaving a smidgen of a gap so it looks like a knob. You can see that better on the photo after this one.  Annoyingly the pins are too long and need nipping off on the other side. I don't have any pliers than can do this.  All done and dusted - well, wax- polished, actually and set in its home awaiting its 'silver' or glass.  |
--------------------------------------------------------------------------------------------------------------------------
When doing furniture kits you need other stuff to be going on with as each step needs an overnight drying process so even a simple piece like the hunt-board takes five or six days. I try to find little odds and ends to get on with like this one.
I bought two inexpensive plaster pieces a while ago - In this photo I have started to paint the base
 |
| Add caption |

 |
| New to me and very good - Humbrol acrylic water-based, bronze metallic paint |
 |
........with the stupidist lid! If you look at the picture of the unopened pot the new design plastic pot looks like their many, many years of little metal tins of paint with a traditional paint tin lid that you lever up. I had many goes at that without success before realising the top unscrews. Not only is there no clue to this, but the actual join where the top splits from the pot is hidden underneath the label. Needless to say this has since been successfully decanted into one of my little jars.
|
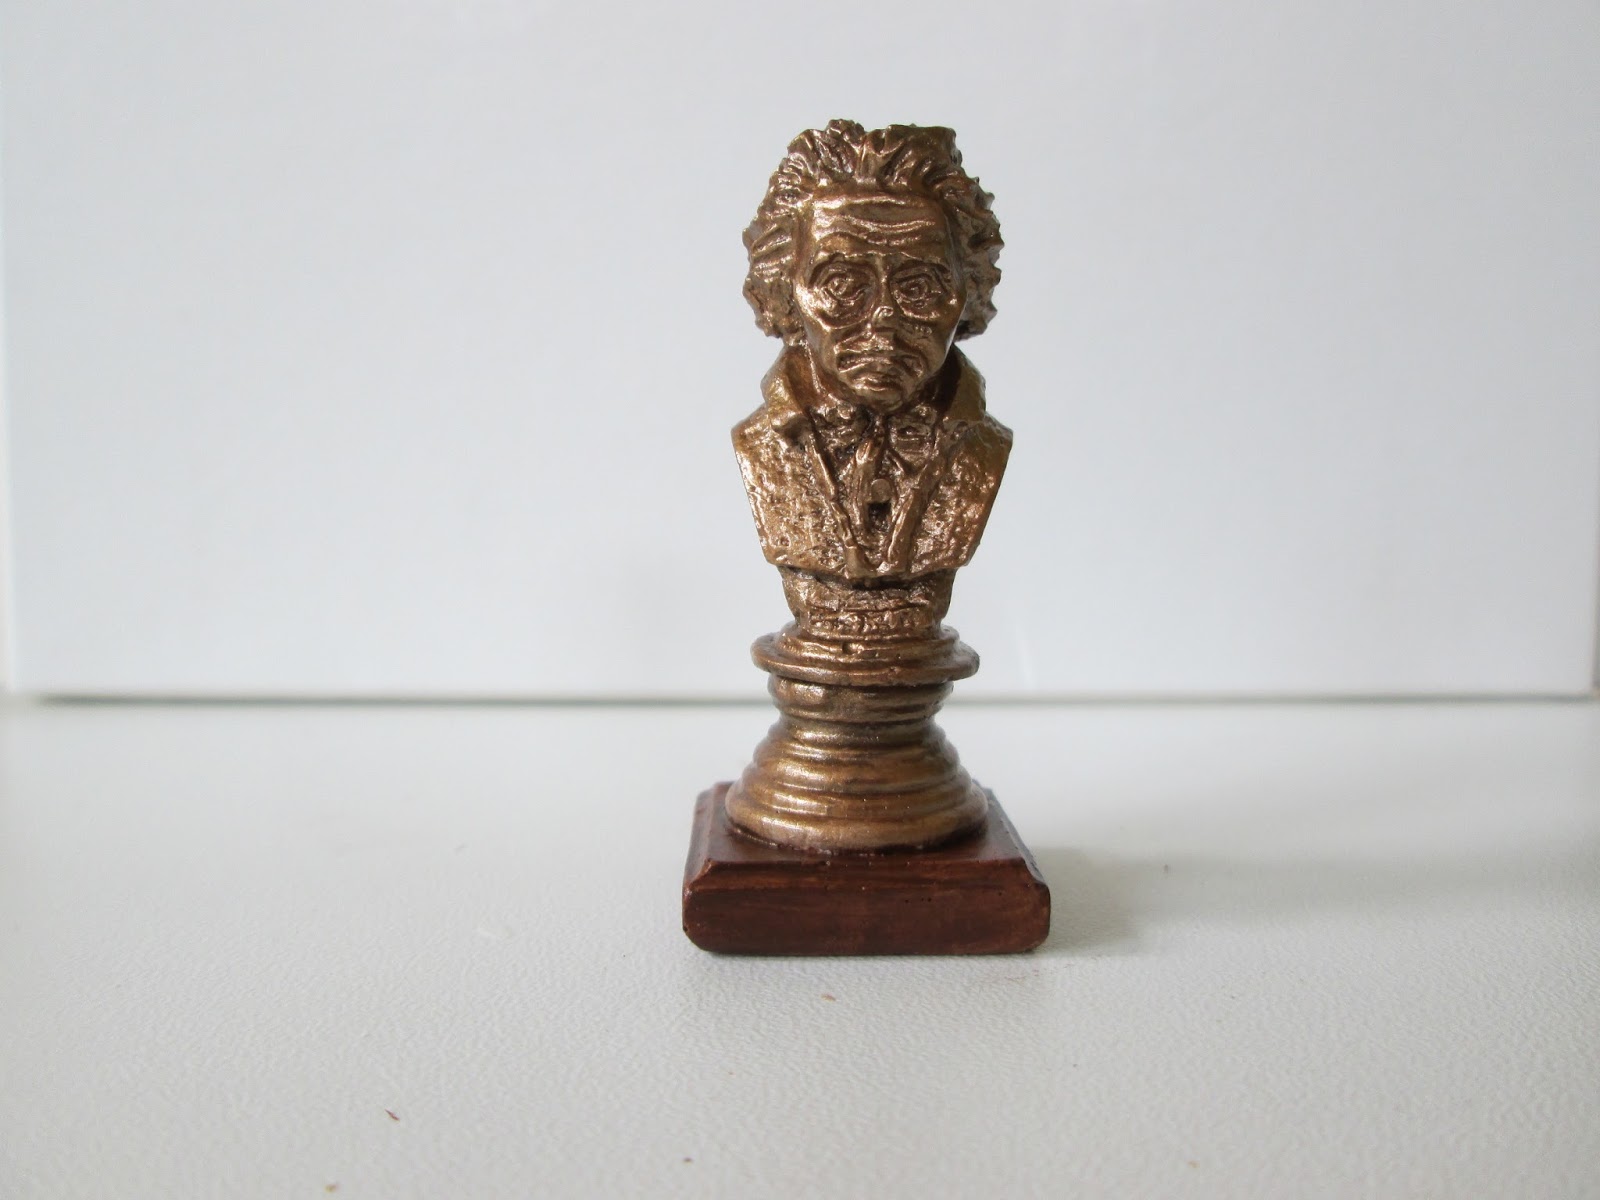 |
I love the end result - bronze bust of Mozart on a wooden base. The wooden base is as simple as painting the plaster base with the (new) gel stain
|
 |
| ....then I dropped it! (28/08/17) |
Subscribe to:
Posts (Atom)