Saturday 29 July 2017

Music Room - A trim too far?

It is strange the things you get up to trying to avoid watching paint dry.  I am painting the various trims to go in the music room, all twelve of them, so there is a lot of waiting time between coats drying.

So, meanwhile, I pondered how to pretty up the music room without it getting too decorative - bit of a contradiction.  I have ended up with a very plain room - just as in my real life.  On the one hand I validate it by saying this is how I would live there and that Elizabeth is my alter ego in my dream life so why not follow that path; then, on the other hand, making minis is a way to escape your real life and real self and do something else.


Back to the overly plain room.... how about a decorative ceiling.  I did lots of gandering around the web looking at Georgian/Regency/Adam ceilings and, boy, were they over the top.  Very beautiful but not what I was looking for.  So, starting with a memory of some laser work I had seen somewhere and the idea of keeping it angular (to go with the dental trim) I doodled around on some graph paper.


thoughts become concrete

How to make it (?) not sure cardboard would work, lets try coffee stirrers....


made more concrete
Here is the finished product - a bit inelegant but you get the idea.

spot the missing bit

In this room I would need two of these to define each area.  The room is a combined original room plus a space that was once divided off for a staircase.  The position of the windows make my larger room sort of offset still with a larger and smaller portion.  It works fine and rooms were often like this.  The main part of the room will divide again into two as there will be two ceiling lights, one either side of the ireplace.  I measured and fiddled the paper and stirrers up on to the ceiling along with a light and tried to imagine another to the right of it.  My plain brain screamed, " Too fussy, too fussy"


Do I like you?

How about if I  paint you white and cut you out?


Still probably too much for my plain room.

So, I wandered around the house.... no use in the dining room or sitting room unless I put one in each as the rooms are - one on the left of the hall and one on the right of the hall and it sorts of knocks them off symmetry.   That left the hall......... 
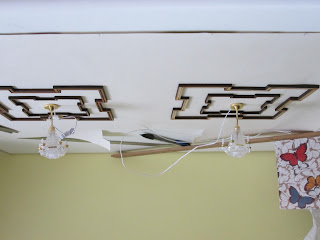

winky-wonky


It is a bit winky-wonky and either the light is off centre, or my home made 'plaster-work' leaves something to be desired as it won't quite centre itself nicely.  It has set me off wanting one (or two) proper ones though for somewhere.

--------------------------------------------------------------------------------------------------------------------------------------------


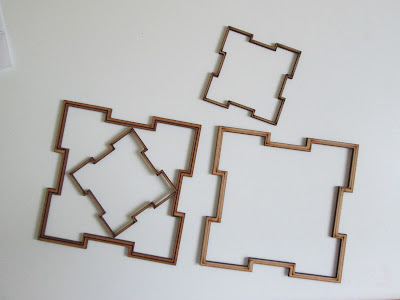
Hey Presto - ordered from Dolls House Direct.  Now the big debates begin.....

.......small set diagonally, small set square on, two pairs in music room for each light in there, one in dining room and one in sitting room, one in the hall and none in the other rooms, none at all.....  see how my poor festering brain dashes around getting no where.


First I made a template of the ceiling using a wallpaper sample


Then spent ages deciding on best place for them


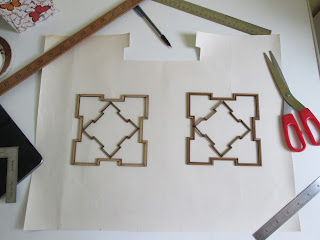
I balanced the lights where they would go, took a photo and spun the photo upside down so I could get an idea of what they would look like suspended.......  OK that was eleven squid wasted - just don't like the idea any more - find it too fussy for a room I intend to keep sparse for paintings and they drown the puny lights.  (ceiling too low for grand lights)


(18/5/17)

Saturday 22 July 2017

Library Trims

 I used to add the three pieces of trim you get with a door in situ, but I now find if I join them first and add them as a unit it is easier and I get a better balanced result.


trio for a doorway


Sometimes you can get a badly fitting corner with a gap like this.

nasty join

I keep a small jar of sawdust collected from any sawing I do

need to cut some wood stock is getting low

 I dip a brush in paint and then in sawdust and push it into the gap


shove it in

Let it dry and rub it over with the usual fine buffer, clean it up well and give it another coat of paint. I do this with any bad corner joins in coving and skirting too.


still needs a bit more cleaning up before painting again
When painting trims like skirtings and coving try to do it with the thinnest of coats - two or three thin coats are so much better than one gloppy one.  The first coat really is a primer and the wood needs denibbing when its dry before adding the proper coat.  Be sure to be scrupulous about removing any dust from the sanding process.  Wipe with cloth and use a dry brush to clean any grooves.  Usually, if your paint is good, a second coat will see the job done.


First/primer coat

So, when all prepped and painted, trims go in place.


tidied up door trim now looks fine
The small cupboard trims were nice and easy to saw through.  In the photo below the joins need going over with paint to finish them properly.


I thought that the white skirting and coving that I added to finish the room looked very 'contrasty' and not at all what I wanted so I just painted over it - very, very carefully - in the same colour as the shelves and everything went much calmer, including me.

I could not figure out any way to make the convex coving around the top of the shelves meet the concave ceiling coving in a neat join - two completely different profiles.  In retrospect extending the shelf coving might have been a better idea. 


I thought I might need about a hundred more books but decided I should check properly so that I didn't end up buying too many.  Huge joke - it seems about five books occupy one inch of shelf and by the time I had multiplied out my inches I actually need about 500 books.  (My first calculation came out at 2,000! and caused a bit of a panic)  This is the moment where I really, really regretted the idea of a small library.  Hey ho!


----------------------------------------------------------------------------------------------------------------------------------------


It has only taken me five years to realise that a small box on your desk pretending to be a rubbish bin is really, really useful!


desk bin


(18/5/17)

Saturday 15 July 2017

Finishing the bookshelves


 I left you with the bookshelves ready for painting.  needless to say that took a while to even start..... what colour????  Again!!!  Why does it always come as a surprise to me that every time I have to 'choose' everything stops.


Greens too dark, woodstain not great on bass wood

Luckily before I had to actually paint them, they needed the prep done.  I can't emphasise enough how this is the step you can not afford to skip.  before painting or staining any wood give them a good look and FEEL.  Feeling is even more important, if there is anything not as smooth as smooth, make it so.


Top is before, bottom is after
 Think carefully about which areas you actually need to paint.  Try to leave any wood that is to be glued to anything else unpainted as wood to wood will certainly glue better than paint to paint.


one coat
 Rub down after one coat and do a second or even third.  I only needed two coats this time. Then choose what finish you would like to add.  I had used a Craig and Rose chalk paint (eu de nil) and I wanted a (1/12th) gloss paint appearance.  I tested three areas I painted on the back of a piece with wax polish, and a gloss and a satin varnish.  Satin as usual won out.  Wax seems to do nothing unless you work away at it for ages, gloss is too shiny at 1/12th scale and satin (for me) is just right. (said Goldilocks)


R to L - wax, gloss, satin
I made little cardboard templates as usual to mark up the spaces between the shelf positions, marked them with a pencil, then glued the shelves in.


template and pencil line showing where shelf needs to go


 Another teeny cardboard template came in handy to mark the position of the door knobs so they were all in exactly the same place without having to measure and mark them.  'T' for top....


I drilled a small hole and found the knobs just pushed in so perfectly that I didn't need to glue them.  I always love the detail in this game and find these tiny knobs so pleasing.  They are incredibly tiny, wonderfully detailed and made in a lovely wood.  You can get them from Elf Miniatures without them having to be part of a kit.  (£2.35 for ten)


I am not even varnishing or painting them

I needed to add a couple of strips of wallpaper to the bits of the room that wouldn't be covered in bookshelves...


......... and locate the shelf over the door.....


Then it was just a simple case of gluing in the shelves themselves.


just waiting to be trimmed


(18/5/17)


Saturday 8 July 2017

Fireplace goes in

This should be a pretty straightforward visual of the fireplace and chimney breast going in place.

I used double side sticky tape on the bottom of the chimney breast.  The thinking being that glue would make a mess if it dragged on the floor. Ideally it wouldn't touch the floor as there was enough wriggle room to get it in without doing that.


My usual De Luxe model glue on the back of the chimney breast and fire box.  I find it sticks to paint better than wood glue does and the wall it was going to was painted.


 Remembe the previously drilled holes and the cocktail stick marker, that was I was working with to get the 'unit' in exactly the right place.  It was  all a bit fiddly locating the hole in the fire back without shoving glue hither and yon.  Success though and the chimney breast shoved nicely on to the back walls, no gaps, no funny angles.  I do like this MDF kit.


The marble hearth in front of the fire measured six inches the chimney breast measured five so I used an easy guide of a six inch ruler to glue the hearth down at the half inch mark.


Everything nicely centered and the grate and coals could go in.  This isn't glued in.... just in case?


The mantel went in in place just by eye as there was very little room for error


I now have a room just waiting for all its wood trims.  Not especially looking forward to a couple of days painting trims but needs must .......


Major learn from this .....  no need to get fancy schmantzy and drill the hole for the fire wire at an early stage and then spend ages fiddling a 'unit' into place.  Skip that move and just measure and mark where your chimney breast will go (on the wall or floor using masking tape)  and glue it in and, then drill the hole for the fire wire through the fire-back and back wall.  Obvious really.

Saturday 1 July 2017

The floor

 Here comes a detailed step by step description of the music room floor going down - feel free to skip it.

My favoured flooring is a real wood walnut flooring made by Houseworks.  It can be bought in the UK and the USA.  It is a great quality product, nice colour and accurate size floor boards for Georgian houses. Wider floorboards are late Victorian onwards.  It measures 11 x 17 inches so is a good size and generally covers most floors in one sheet.  Costs £9.95 from Jennifers of Walsall.

First step is to cut out whatever is needed to cover your floor.  You can now use the board as it is is or wax or varnish it.  I use a satin finish B & Q water based varnish, easy to apply, easy to clean up with soap and water and you can get a small tin which has lasted me over four years!  Handy tip - decant to a jar as the tin not only gets 'gummed' up, it also tends to rust and drop bits in the varnish - same with paints - all mine go in jars.  After the first coat is dry (overnight) if you rub your hand over the surface it will feel really rough this is the action of liquid on wood.  To denib it I use one of those nail buffers I mentioned in the painting post a couple of posts ago. One quick buff over is enough, don't over-do it or you will just remove  the coat of varnish and then be starting again.


They then get a second coat.  This will have made the sheets curl up a little.


When absolutely bone dry I layer the sheets between baking parchment (any silicone based thing will do) to be sure they won't stick to anything and weigh them down overnight.


In the morning I have nice flat sheets of finished flooring to put in the house.  I keep the parchment for same again or painting or gluing on, useful non stick stuff.


The most important edge in the room is the one running across any doorway, others will be covered with skirting board so they don't need fussing with.  The floor running along the door edge needs to but up to it without the tiniest gap.


My door in this room happens be at the back but I can't start with a piece of flooring back there.  It is important to lay the floor from the front edge so that it runs perfectly in line with the front edge of the house.


First mark up where any seams will go, you will need these places covered in sticky tape or glue if you use that.  Not keen on the idea of glue all over, makes removing the floor nigh on impossible.  Haven forbid you will ever have to.... but if you do.....


My sticky weapon of choice is very thin double sided sticky tape - not the foam kind which would make the floor stand proud of the surface but any which is as thin as sellotape - indeed it is actually thinner than that when the wax paper is peeled off.


Tape all the across points - here I have taped the front edge - right to the very edge, then I taped where the seam will be, about two thirds down the room, and then the back edge, finally I ran another line  and another line between the seam and front edge.  I now needed to lay a vertical piece down for the seam which runs front to back, so the protective paper has to be peeled back to allow that to go in place.


The front right piece of floor goes in first to ensure a good edge at the front of the room


Then the back right piece.  The challenge here is to make sure it joins well with the front piece and buts up against the door sill perfectly.


............the front left goes in next, again checking that front edge really carefully.


.......... then the back left section and it is done.


You could now give it another coating of varnish in hopes of pulling the seams together a bit more, or a couple of coats of wax polish or, as I do, nothing!

Major learn from this ...  I don't remember having had a a room so wide that I had to join the flooring with a seam running from the front to the back of the room before.  The seams do show.  How much this will annoy me when the rugs are down and furniture is in I don't know but I so wish I had turned the flooring the other way round.  If the boards had run front to back the joins would not show at all!!!  I considered it briefly but always prefer the boards to run across the rooms (we read left to right so it is less jarring on the eye?) and I wasn't sure it would make a huge difference and I didn't want one 'odd' room.  I now regret that choice.  I am not ripping it out and redoing it at this stage as the fireplace has also been put in place and it would mean all kinds of messes to deal with.


(8/5/17)