Saturday 26 August 2017

The Great Book Challenge

A  while ago I mentioned that I calculated I needed 500 books to fill my bookshelves.  I realised that even if I managed to buy them at an average of 50p per book I would have to spend £250 - clearly that wasn't going to happen!!  So it was a case of knuckle down and make a bundle of books now and then.  

Months ago I made up two sets of Mini Mundus Books which I really liked doing and I liked the finished result but they are £25 for a kit yielding 84 books.  This works out around 30p per book; so not a financial possibility for the quantity I need.  Also, I can't have a library filled with the same sets of books.

If you want to see those books click on Mini Mundus which I hope will take you to the post.  Failing that click on 'library' label in left margin of blog and scroll through those posts until you get to it or find it by date order of posts - 25th August 2015 (wow, so long ago)

Off I toddled to search on line for free printies for 1/12ths.  I know there is ton of that stuff out there so I easily found and saved a few likely pages and I began mass production.   So off to step one of bookmaking as per me.

Download the printie and print on ordinary A4 paper.

I then coated the print with matt Mod Podge to stiffen the paper, protect the print and give a slight sheen to the covers.  I do find it makes the inkjet ink run but I don't think it matters for this purpose as nine tenths of the book will never be seen again - in reality this will be 500 book spines I am making!!

When it was bone dry I cut out the covers.


I began filling the first couple of books with long strips of copy paper which I concertina folded and glued into the book.  I find concertina folding fiddly at this size as it needs to be spot on accurate for a good result.  The alternative method was to cut double page size pieces, fold in half and glue those together to form the inners.


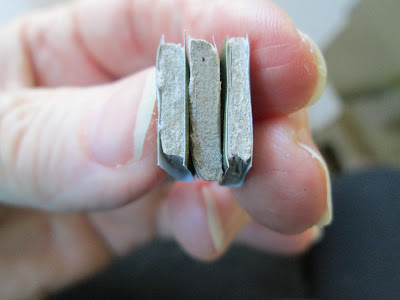
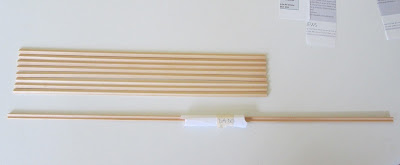
This worked fine but the process needed to be speeded up.  Thinking about the Mini Mundus set and the speed and ease of filling covers with balsa wood I searched around for something the right thickness for my printies.  Out came old faithful - the grey cardboard.


The appearance of the end result again doesn't matter for my purposes - loose pages obviously look better than the cardboard but neither will ever be seen.


pages


cardboard


There was also a downside to the ones with pages in - they stopped the books staying neatly closed.


I intend to glue sets of books together to make them easier to load onto the shelves.  They are not things of beauty but hopefully with some nicer books mixed in here and there they will do the job - Elizabth is collecting 17th and 18th century texts after all so scruffy is fine!

On my searches I also paid (!!) £1.91 to download this music book printout.  I am going to make a set of six to stack in the music room somewhere.


Concertina fold and glue

Mod Podged the cover

I made better corners on the next books

I came across a lot of nice maps in the free printies so I decided to do a page of those too.  This time no Mod Podge was involved but I did paint the back of the paper with a mucky coloured water colour wash to get rid of the bright white paper.  When bone dry the maps were rolled around a toothpick and relaxed a little, then re-rolled, not too tightly and not all the same.  The roll was fixed with a spot of glue and stacked (for now) in a book box.  They look good beside the library desk.


PS:  If you do ever have this book challenge - look forward to it.... no, really.  By day two I had found ways of speeding up the mass production process and found I could make little groups of books in very quick time as long as each book didn't need to be a perfect specimen which, of course, they don't.  Let go of that requirement and you end up with great looking little groups of books that look just perfect on the shelves of a bookcase.


(24/05/17)

Saturday 19 August 2017

Finishing the Music Room trims

I have written copious amounts about trims - painting them and cutting them etc so there isn't a lot I can add here.  If you have only just found me and want to know about adding trims just click on the link 'Trims' under the Labels heading over in the left-hand margin/column.

However there may be a couple of tips I can offer up about painting.

Brushes -  Over many years I have acquired a zillion brushes for various reasons


Even when they are decidedly defunct I keep them and use them for one-off jobs like gluing or staining.


These have been my two favourite all-purpose painting brushes for minis for years.  They are just cheap Chinese made ones picked up somewhere along the way but they have worked really nicely for a very long time.


I recently saw a set of Daler (good make) brushes in a sale and thought it would be nice to have some new kids on the block.


Since which time this size 8 Flat Shader has become my all time favourite.

Paints - 

The paint I use for white interior wood work is Valspar, Tidy White, Silk.  All my paints for everything are water based for easy clean up.

When I opened it, the top was covered in about half an inch of grey oily liquid - this is the silk finish element of the paint and rises to the top when the paint sits for a while.  It takes a lot of stirring in.  This is a really important step with almost every paint you use - elements will sink and rise and generally separate out from the base and will need a very lengthy stir - long past the point where you think it looks OK - if you want to achieve the best possible finish.  I use a coffee stirrer for this but I am on the look out for a very small whisk.

I forgot to take a picture of the paint I am using, but this jar of wood stain is an extreme example of what I mean.  It is a full jar and has 'split' into about 25:75.


 I decant paint samples into little jars - those jams you get in hotels.  The larger jars are ex Tesco Finest various sauces....mint, apple, cranberry etc.  They are good for larger quantities of paints and some 'finishes' such as varnish and wood-stain.  They are all much easier to use from jars rather than their badly made containers, they stay cleaner, tops go on and off easier and I can see what I have easily.  They are light protected as they reside in a drawer.


Artist acrylics stay as they are in another drawer

Add caption

My Valspar paints (sample size for about £2 something) already come in great plastic pots.  With a couple of thousand choices of colours and three finishes and good value and a quality finish they are simply the best for me.


Ooooh look, three tins waiting to be decanted into jars.....

and finally.....

Trims in the Music Room

Dental trim for the Ceiling

As always I don't want the hassle of trying to measure accurately the length of each piece of trim I need to cut.  I tear up paper strips from a magazine....


Press it carefully into the two edges where the trim will go making very accurate, sharp creases with my finger nail.  I then remove the strip and use it to mark where the cuts need to go on the trim. 


I always begin at the back of the room and, if there is a fireplace, I work across that by fitting a strip either side of the chimney breast first.


I then construct the three pieces needed to wrap around the chimney breast before gluing them in place


 And so the dental trim around the ceiling is finished


Dado Rail


First thing to do is mark up where the rail is to go.  I use a piece of cardboard I have now had for years.  It is a three inch strip that I slide around the wall, making sure it is sitting neatly on the floor and draw a pencil line around the wall, marking where the rail will go.


When I paint thin strips of wood like dado rails I do have a 'system'.  The top edge and bottom edge need to be painted first and I use my finger for this, brushes are just too large to do it smoothly.  I can then lay the piece flat down and paint its face.  All trims take two or three coats, rubbed down between each coat

showing the second finger painted coat along the top edge
They are measured and cut in the same way as the ceiling trim and in they go, followed by the skirting board.  

Skirting Boards

The secret of successful skirting boards is to make sure the top edge clings to the walls - it looks dreadful if there are huge gaps.  I use my favoured De Luxe glue.  Whatever you use let it go very tacky before trying to fix the trims to the walls - you want them to grab as quickly as possible.  With skirting boards I make sure all of the top edge has glue along it and I add a few drops of superglue here and there to give it an instant solid grab when it goes on.  You also need to push them hard down on the floor to make sure any kinks in your flooring don't shove the skirting out of place.


The room is finally ready for me to find all those chairs and a card table and paintings that it needs.

There will be two chaise lounge type window seats at the front edge of the room.  The idea is that this is a 'public' space in the house used for the occasional 'recital' so it needs to seat about a dozen people.


------------------------------------------------------------------------------------------------------

Penny pincher's footnote:

Most of my trims on the last couple of builds have come from a fabulous dollhouse (and trims/mouldings) maker - Doll House Cottage Workshop.  My introduction to them was at a show when I was working on Chocolat and I asked if they could make me some treads for stairs to trim up some pretty ugly MDF ones.  This was duly done at a great price and good speed.  The wood used for his trims are of much better quality than those generally around the place and his prices are pretty much the same.  What's not to love. 

A couple of months before the York show I was ready to do the music room dado rails and I went to my box of wood to discover I only had one DHCW dado rail left.  Being a cheapskate I decided to hold off and pick some others up at the show and save myself some postage.

I found three lots at the show and none were outstanding - eventually I settled on a vendor and bought eight pieces (to stock up a little).  When I came to use them I discovered they weren't long enough for my room.


Good old DHCW trims are 18 inches long and these were only twelve and I didn't even really like the profile of them or wood quality....so I saved a lot of money there then .....not!


my one good one alongside the 'good idea' ones

Off to order from Chris and the following day I had dado rails (five for £4.50) and a strip of board for stair treads (99p) which I want to make windowsills out of 

lovely stair tread strip

 and .......   here is the 'nutty' purchase.... some terracotta tiles for the porch of the next project that I haven't even bought yet and may never do so....  but I loved the tiles (£3.50)


Apologies for an overlong and rather disparate post this week.  I am trying to get back on track.


Saturday 12 August 2017

Mas des Roches

This is a bit off-piste this week - First, I thought I might show you my new project - Mas des Roches.

Click here:  Mas des Roches

-------------------------------------------------------------------------------------------------------------------------

I wondered if you might want to see where I 'work'.  A couple of years ago we had a very posh 'lean-to' built on the side of the house (back garden) for my workshop and I relinquished the spare bedroom back to its purpose.  I also lost my small greenhouse, but I did gain a lovely well-insulated, cosy work room.

As it is the place where I am as busy as a bee, it acquired the moniker - The Hive..... sounds so much better than I am off to the hut......


the work bench area for dollhousing

the office side of the hive
The two long tables are pieces of the cheapest work surface from B & Q and five height adjustable legs from Ikea.  There is one leg in each corner and one in the center at the back for added support.  Normally you would also need one at the centre front over this length for proper support.  I didn't want on there as it would be where I was sitting.  I didn't want to put a support batten on the wall in case the room got changed for something else sometime.  In actuality they don't need additional support at centre front because I dropped the height of each side to rest on the chests of drawers I already had.  There is a pair of wooden ones on the office side and a pair of metal Ikea ones on the work shop side.

The trolley at the back of the room with Dalton House is Ikea again.  You buy the wheels as an add on to one of their cube kits.  Drawers are also an added option.  I needed more width and depth so I simply screwed on a piece of MDF and painted it.white.  The trolley is a huge advantage when I want to get around the house - to the back for wiring for example.

I just realised how neat as a pin everything is.  To be honest this is its usual state.  I am probably bordering on OCD when it comes to being tidy.  Obviously there are moments of chaos but they do get cleared away as soon as I am done.


My commute from the kitchen door and through the arch

View from my chair


-----------------------------------------------------------------------------------------------------------------------


Normal service will be resumed next Saturday for sure.

Saturday 5 August 2017

Corner Chairs

Apologies for anyone who found the empty Music Room Trim post this morning.  I write posts as I do things and bank them.  A long time ago the trim post was just a heading in the right order of things that I intended to come back to and write up when I finished the trims in the music room.  Trims still not finished and no post filled in and worse still I forgot the cunning plan!  I can only say that for a year now real life has been chucking a lot of bad stuff at me and I am spending much time running back and forth between Edinburgh and Manchester so playing with my minis has been on the back burner for a very long time.

Any way I have shuffled the empty one along and here was the next one in line for your delectation.  

Again my apologies for the confusion.

......................

While I was waiting for trims to dry between coats I dug out a pair of corner chair kits I had bought.  These were destined for the library.  Watch  this space.


kit


contents
You might want to spend time shaping pieces and smoothing the wood with your finest 'smoother' before you start as they have way too many creases and corners once they are glued together.


smoothed, shaped and all glued together
I use simple wood glue and toothpicks.  Try your very best not to let any glue squeeze out of the joins and clean it up as well as you can if it does.  Stain and sometimes even paint does not take over dried glue.  I clean up using another toothpick. I hook out the excess carefully and then tend to wipe it on my left hand as I go along (for speed).  This isn't a recommendation as it often creates a 'panic' moment when I go to wash my hands and wonder what strange skin disease I have acquired before remembering I was gluing a kit. 


Leave it as long as you possibly can for the joins to become really dry and allow the glue to set up properly - 24 hours is a minimum.  You can now give it another go over with your nail buffer/smoother and make sure you clean up any dust before staining.


Staining - This is what I use to finish the pieces.  You really should do a better job than this and there are instructions in the kit on how to do that.  

For me, I use wood stain, and a gloss application from a water based Ceramacoat product and a felt tip and old MinWax pen.  


I use the min wax pen to apply the stain.  You can't apply it with a brush.  The instruction on the tin recommends a soft cloth...waaaay too unwieldy.  I have a couple of Minwax pens that have pretty much dried up and I didn't do any good with them on 1/12ths (they were good for 48ths).  So now I decant some stain into a glass container and dip the pen in and away we go.  Do not decant the stain into plastic - I did that once and the stain ate the bottom of the pot and I had a desk submerged under a stain tsunami.  Stain works really well!!!

I do know folk who say they have a larger container full of stain and they simply dunk the whole piece in.  I have never done it with 1/12ths - not brave enough .... and don't have enough stain!  I did do it once (on someone's recommendation) with some 48ths and then broke my heart as all the lovely little things I had made fell apart as they were far too soaked in stain.  Took a week or more to dry out and then refused to be glued together again as, of course now all the joints were covered in stain.

Another useful tip is to decant the stain out of the tin into a glass jar as soon as you've got it home.  Who ever designed the stain tin needs shooting: there is no conceivable way to pour a small amount from the tin without making one heck of a mess around the top and sides of the tin.  I promise you my usable stain is in a Tesco Finest Mint sauce jar!

The small pen in the photo is a permanent marker in brown - this does a great job of going over any bald spots caused by leaked glue.


finished chairs
 The finish isn't wonderful - in part because I don't do the proper wood finishing steps needed and, to be fair to me, the quality of the wood in these kits is not the greatest.  When you see the lovely museum quality work at shows their creators always begin with the very, very best materials.

The choice of fabric may seem a bit chintzy especially as I have a ton of lovely silks to go at but as always I couldn't settle on one I liked and this looked nice against the wood and it works in a couple of rooms.... beginning with the library...... which is the room they were bought for.


I decided I don't like the mahogany with the desk and chair that I already have - Oh poop!


The colours go well in the hall but I am not really keen on cluttering up the hall with two chairs.

Oh well they were fun to make even if they never get used..................


(24/05/17)

Music Room Trims