Saturday 28 October 2017

ELF Kitchen, left side

I have written at length about putting ELF kits together so won't do so again here.  This is just a fast record of the kitchen units assembly. If you have only just found me and would like really detailed information just click on a couple of links over to the left of this post.  Under the Labels heading, choose Furniture kits.  If you want to see an ELF kit going together go to My YouTube Videos, again in the left margin, and click on How-to-Videos.  You will find it listed there.

In this post, as I said, I thought I would briefly record the process for the diary aspect of this blog (for myself) and as a quick reminder for anyone else and, more importantly, as reassurance for anyone wondering if they could assemble an ELF kit.  I am sure the old adage 'if I can do it, anyone can', is absolutely true.

None of the photos are staged for your delectation so I hope they are not too confusing to follow.


Day one.  I spent a lot of time just sorting out what the pieces were and how I would approach the work.  I clumped together all the stuff that was needed to complete the 8" side of the room and put aside the items I would need to make the 6" inch side.  Eazy kits are based on simple boxes with all the doors and drawers and cookers etc added to the front of these.  Here, I am making the second of the three boxes this 8" side will need.  They were all glued up before lunch in hopes of being dry enough to paint after lunch.... I do have to cook it as well as eat it so there is a longish gap in the middle of the day,  Basically this is less than a couple of hours work and much of that was used up giving it a good coat of thinking before I raised a toothpick in anger.


 By the end of of my mini working day I had sanded all the pieces and figured out which bits needed no paint, which bits needed one coat of paint and which bits needed three.  The final photo shows the kit being left at the second coat stage for a good overnight dry.  A final sanding and third coating will be applied tomorrow.  


Day two.  Today began with my adding a third coat of paint to the edges of various pieces and a couple of other places to ensure a perfect finish anywhere where the paint might be seen.  I should mention the other paint is just to make a good base for the sticky back plastic film to stick to.

While this was drying I made up the under-counter fridge kit, beginning with the usual box building.


I sanded the piece of steel to round off the handle.


I carefully marked where I wanted the glue (and therefore the handle) to go with the point of a small drill and then put a ruler on the door so I could add the glue and the handle and keep the handle dead straight as it ht the superglue.  What you really don't want is any superglue on any of the aluminium surface.  Great care is needed.


Et voila - one stainless steel fridge which looks absolutely spiffing in real life.  Much less crinkly than it looks here.


After that all the paint was dry and the pieces were sanded and everything that needed to be wrapped in sticky back plastic was wrapped.  I am using a plastic gloss finish for the first time.  All my previous ELF kits have been painted.  I just wanted to try something new.


Day three.  

My fabulous worktops arrived.  The 'real' granite tops are from the equally fabulous Dollshouse-Flooring.com  via ELF Miniatures.  To explain..... I wanted to have an underslung sink and didn't know how to cut out the hole for it.  Elizabeth from ELF was about to order some things for other projects from Graham at DH Flooring so she suggested she ordered my worktops along with those and she would cut the hole for me.  Here they are along with a ceramic hob.

The edges of the tops are polished and the correct corner is rounded off for me.  All very subtle in the photo but meaningful to me in situ.  Most of all I love Graham's attention to detail.


I thoroughly enjoyed putting the oven kit together.


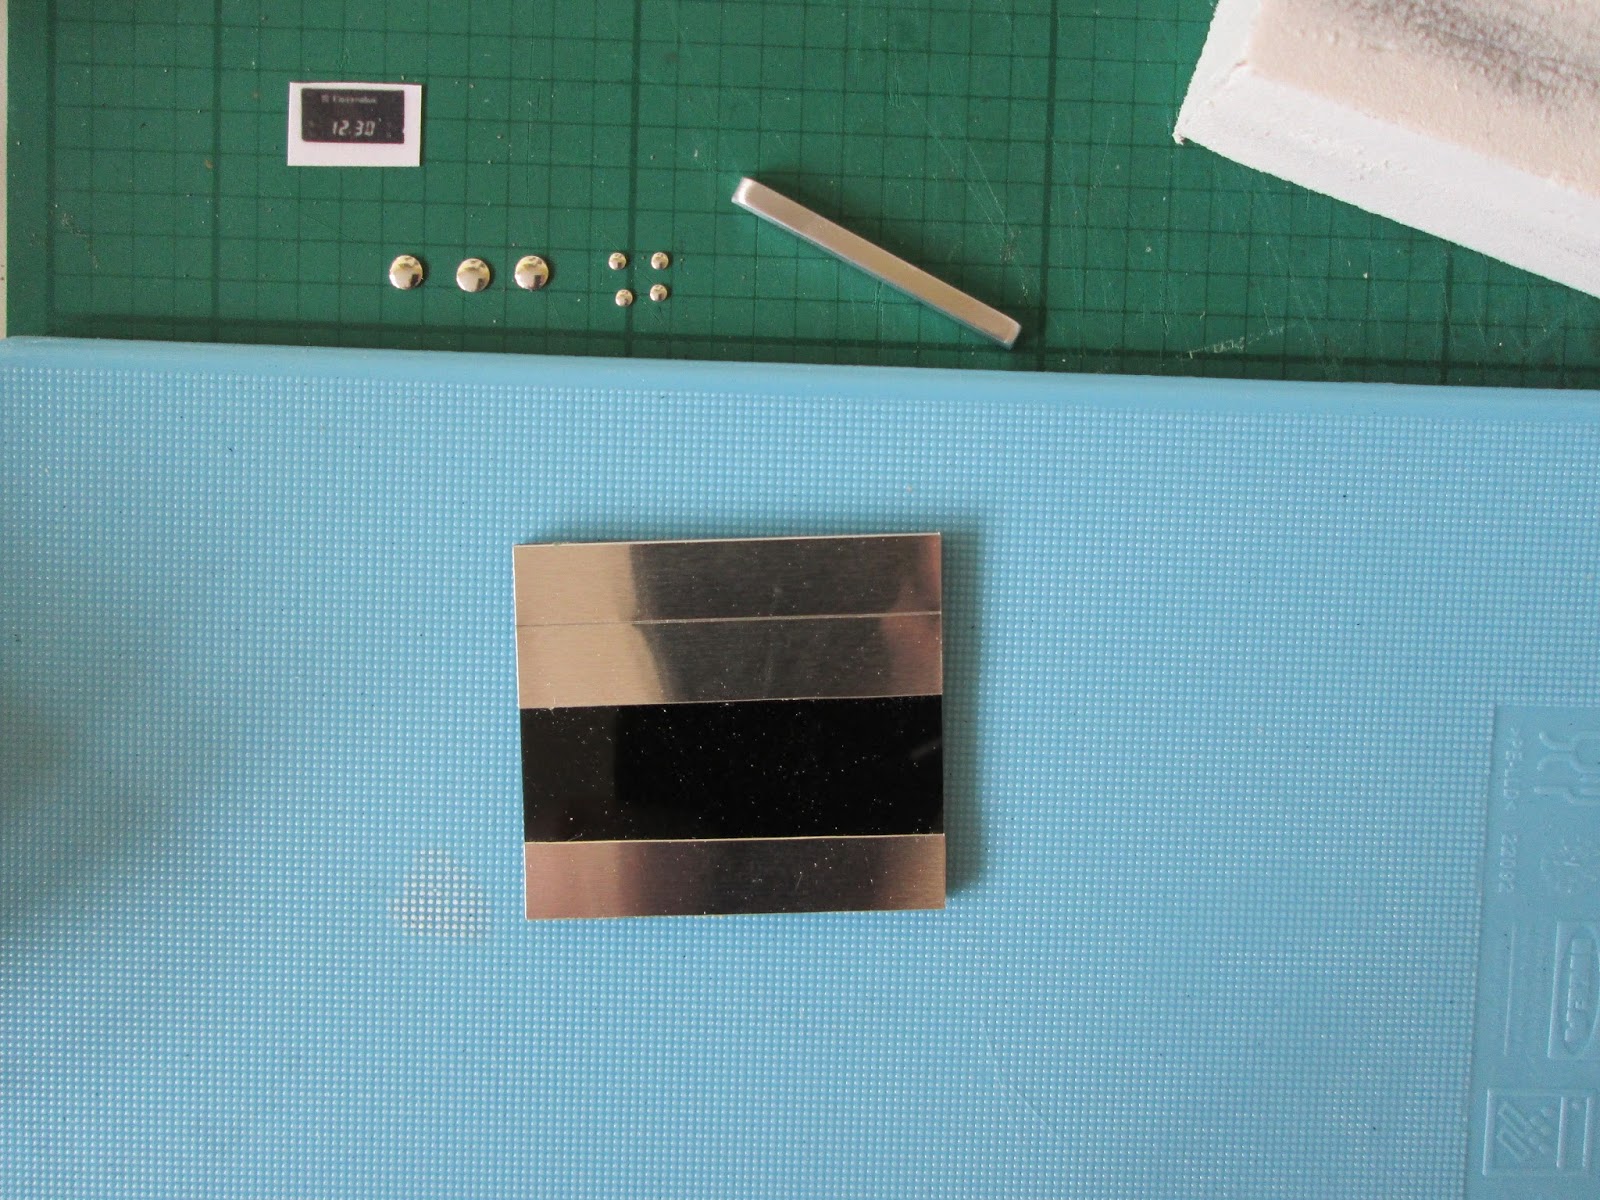
The black glass with the two strips of aluminium glued in place

Then I made the cooker hood.  The lovely realistic filter is just a piece of mesh from ELf and a bit of white card (my own) cut to shape.  The instructions suggest it is spray painted with silver paint.  I don't have tons of stuff like that to hand but I discovered that my trusty silver pen did a great job.  Bit of a trim around the edges and it was good to go.


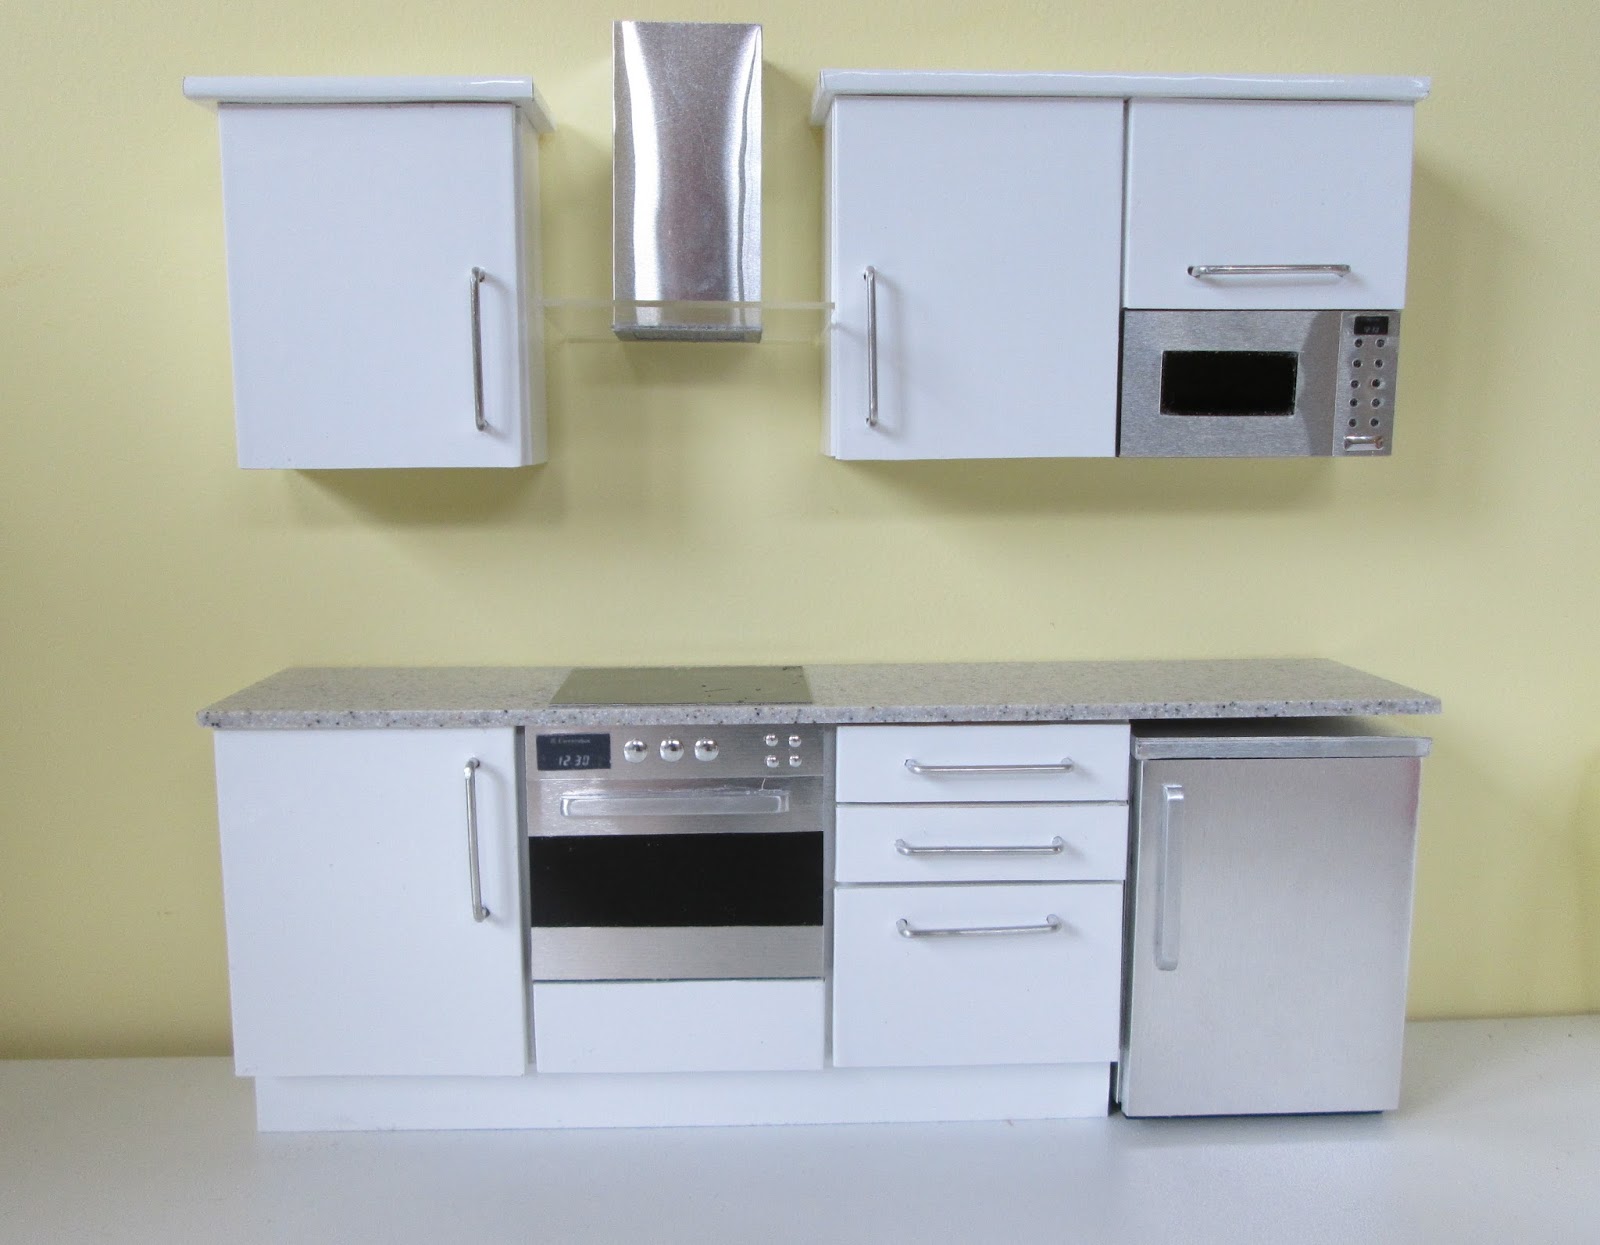
By the end of the third day I had one side of the kitchen done


the hood is not curved it is just catching the light that way

The background is my worktop and hive wall; the kitchen is not in place in the house yet.


You may have noticed I weakened and added handles to my original plan of sleek no handle cupboards - they just sort of looked unfinished????

(08/09/17)

Saturday 21 October 2017

A Hunt Board for the Dining Room


A hunt-board is very similar to a sideboard but is generally taller, smaller and a simple design.  I think nowadays no-one is bothered what we call what, so most of the furniture names have become interchangeable but if you want to be pedantic, like me, 'sideboard' pieces should have different names depending on their shape and size and use and historical beginnings.  So a sideboard, credenza, buffet and huntboard are different creatures.


The reason for its name is that it was traditionally used to hold the hunt breakfast.  It therefore needed to be a light piece of furniture to move it easily to where it was required and to be taller than a table as people would be serving themselves from the dishes laid out on it.  It went on to remain in domestic dining rooms and would hold breakfast items in their chafing dishes for the same reasons.


This is the kit I bought....


This is the inspiration piece - which just confirms the house of miniatures version really


Here it is being assembled: at the beginning of the assembly, it always looks like a ton of pieces when you open the box


Nicely balanced legs.  Remember my blathering about the gel stains....I did add a seal coat but I can't see how it made any difference to what followed and it added a day to the process  to allow for drying.

I did a sort of drawer mass production for the five drawers (one off camera!)
They required a lot of sanding to get them to fit in the spaces
Remember to number them as you go, so you know which one fits which space

This sanding produces the best sort of sawdust to add to paint to fill gaps in your coving and skirting joins, et al.  Tap it onto a piece of paper from the sandpaper so you can then 'funnel' it easily into a small container.


Here is the huntboard with three coats of gel stain.  The drawer boxes are better not stained; they wouldn't have been stained in real life.  I may 'dirty them up' some time.  Don't attach the drawer fronts until you have put the knobs on.


When I added the varnish everything went to pot!  It dragged at the stain and went gloppy in places.  I had to go back over the piece in an attempt to correct the problems.  The large drawer front had to be sanded right back to basics and started again.  I don't have any explanation as to why this happened.

The photo below is to show you just how tiny the knobs and plates are for these drawers (small brass tacks and washers.  There are no spares and are so, so easy to lose.  Always work over an uncluttered work-space (no where near the edge) so if you drop one you can find it again.  I started by holding the work over my lap as I usually do for comfort and a good sight of what I am doing.  I then dropped the nail and washer as I was trying to attach it to the drawer and spent a very, very long time finding them again and even then that was more by luck than anything else.


There is a template for marking up the position of the knobs which is useful. You cut it out and place it accurately on the drawer front and mark up for the pins.  

Mark up and drill the holes with a very fine drill bit - smaller than the pins.  Add a very tiny bit of superglue gel into the hole and put the pin and washer in place and press the washer down with the tweezers until you are sure it has stuck.  Then gently tap the pins in with a hammer leaving a smidgen of a gap so it looks like a knob.  You can see that better on the photo after this one.


Annoyingly the pins are too long and need nipping off on the other side.  I don't have any pliers than can do this.


All done and dusted - well, wax- polished, actually and set in its home awaiting its 'silver' or glass.


I did like using the gel stain heaps more than the smelly spirit wood stain I have been using up 'til now.   I think the finish is marginally better too.  Probably best to not varnish it though and just wax and buff the pieces.
--------------------------------------------------------------------------------------------------------------------------


When doing furniture kits you need other stuff to be going on with as each step needs an overnight drying process so even a simple piece like the hunt-board takes five or six days.  I try to find little odds and ends to get on with like this one.


I bought two inexpensive plaster pieces a while ago -  In this photo I have started to paint the base


Add caption
This is the inspiration piece - I like my £2.50 price better than the auction price shown here


New to me and very good - Humbrol acrylic water-based, bronze metallic paint


........with the stupidist lid!  If you look at the picture of the unopened pot the new design plastic pot looks like their many, many years of little metal tins of paint with a traditional paint tin lid that you lever up.  I had many goes at that without success before realising the top unscrews.  Not only is there no clue to this, but the actual join where the top splits from the pot is hidden underneath the label.  Needless to say this has since been successfully decanted into one of my little jars.


I love the end result - bronze bust of Mozart on a wooden base.  The wooden base is as simple as painting the plaster base with the (new) gel stain

....then I dropped it!


(28/08/17)
PS Luckily I didn't chuck him away in a tantrum.  I took a deep breath and short break and then I nipped off the bottom circle and he looks just fine now.


Sunday 15 October 2017

A zillion treasures

I hope you like looking at other people's purchases.... if not, better to leave now as this will be a long haul.

Hobby's

The first three come from a company with several names!  Letter heading and site name is Hobby's - if you Google this it will come up as 'Hobby's Hobbys' and its actual company name is W. Hobby Limited.  I tell you this because there are so many companies out there that are vaguely called something around 'hobby' that it is sometimes hard to remember or re-find the one you want.  Any way here is its link:  Hobby's


The first purchase, and my reason for being there, was some 3mm strips of pine to make 'joists' for a false floor so I can get wires out the back without having to make grooves.  Great value at £5.95 and happy to see how nice and straight they all are .  Enough here for ages.


Once I am on a site I have to look round to see if I can get anything else to make the postage less painful.  So because I was spending £3.80 on shipping and handling I decided to spend £11.60 on something I had not ever thought of.  Not sure of the logic there.  If this makes up nicely it will be lovely as a side table in my dining room for the 'silver' or 'crystal.


True to form, every time I shop I have to buy a 'why-did-I-do-this' lulu.  I saw a photo of tiled wallpaper which looked like a delft blue and white and thought (as I had never seen it before) I would keep it for something....  the plan being to cut out and stick each square down as a tile and then 'glaze'..... a future splash-back maybe....  any way I am  £1.65 lighter and now own a decidedly useless bright turquoise (!!!) item.  So £3.80 postage plus £1.65 ...my saving post and packing money method really works (not).


ELF Miniatures

Here comes my next series of projects from the fandabulous ELF Miniatures

Firstly the bones of my little kitchen


a scary bag of bits
Then the extra challenges to complete the kitchen

the labels explain what they are

A lovely table and two chairs for the kitchen - the seats will change colour - probably grey.


Two little kits to make a clock and a sidboard


Here's what I hope they will look like


A couple of chairs for the sitting room - I am sure about the lovely fuzzy yellow one, not so sure about the swivel chair.  It is intended for a desk but I am not fixed on that yet.


 I invested in an already made up set of furniture for the bedroom as it was reduced.


 As always I can't capture the colours very well but this wallpaper is really nice.  I saw it originally on the Dolls House Emporium site where it is reduced right now so, presumably, on its way out.  It wasn't expensive over at ELF so I picked up a couple of pieces for the bedroom.  The green background is lovely and soft and it goes beautifully with the bed set.


I have no idea what the legal and moral ramifications are re. buying people but I am hoping it may not apply with mini resin ones.  I have decided to give my PhD student a boyfriend (the seated chap) and have converted the original children into older versions (the standing boy).  I already have the teenage girl.  The seated girl is the bonkers purchase in all this lot - I keep telling you there is always one- she is for the future-may-never-do-it project.  The logic to buying her is that I am not seeing her around a lot and any way I had already paid postage on this lot.  You may shake your head in despair.  


Maria's Fabrics

My favourite fabric vendor, without doubt, is Maria's Fabrics.  I snaffled a couple of 'just the right colour' pieces to make cushions (left) and a soft wool throw (right) for the siting room while I had them in my sight.  This will not prevent me from visiting her stall at the next show we are both at and buying some more pieces for my growing fabric collection.


(26/08/17)

Saturday 7 October 2017

The Loft Apartment Kitchen

I am finally working on the top floor of my house.  This will be a modern apartment for a post-grad student 'lodging' with Elizabeth.

The original three rooms were servants' rooms with a door in the back wall leading to a corridor.  I pretty much have to stick with this division of the roof space so that the dormer windows still work well in each space.  The bedroom retains the door at the back of the room as that now leads to an en suite bathroom.


The middle room also keeps the door as it is the entrance from the corridor to the apartment (stepping into the kitchen).  In the final space, the sitting room, the corridor door space has been blocked up.


Roof spaces with dormers are always a bit of a pain to convert (even in real life) as there is a large strip along the front that can't really be utilised  because no-one can stand up in the space.  In real life it does make for a great built in storage area for each room but if I do this it will (partially) block the view into the rooms and certainly 'stop the eye'.  I might add interesting stuff to the fourth wall for this space.(?)  A further complication is that this space is then broken up by each dormer window where is actually enough room to stand upright.


So, with 4.5 inches 'trimmed from the front the remaining workable space gives me three rooms each 10.5" deep by a little under 12" wide.


If you are interested in the space, click on this to enlarge the photo

I do have to have a door cut through one of the side walls between the original bedrooms. I got my 'handy-man' to cut a hole in the right hand wall for an interior door: this leads into the bedroom so that would need the privacy of a door.  


Using my fabulous (!) universal two-inch cardboard cupboards, I worked that I can get three kitchen units along the remaining wall: a six-inch run.


So, over here there will be four 1.5" floor cupboards with an under-counter s/s sink, with two wall cupboards.  The water pipes etc would be on that side of the room as the en-suite bathroom is nearby.

On the other side of the room I use my trusty friend.... still carrying her books, poor woman..... to test out how far out we can go before we bang our head.  I intend to just chop the wall out here, as if it had been knocked through, so the kitchen and sitting room is sort of semi-open plan.  I don't want actual open plan because the roof in real life would need support and I want to retain some of the wall so I can add wall cupboards in what will be a very tiny kitchen.  Looks like I can get an eight inch run on this side.


 The base cupboards have a small built-in oven and s/s fridge (with a small freezer box inside it).  The right-hand cupboard has now been changed to a set of drawers.  Above these will be two cupboards, an extractor hood and a built-in microwave.


Since sketching out these rough plans I have also decided to go with white gloss and no handles...all very sleek.  This is the 'feel' I am going for......  on a much smaller scale!


The wonderful, wonderful, Elizabeth from ELF has been her usual patient and super-helpful self and after a flurry of emails we have arrived at solutions for it all, including a 'real' pale grey granite worktop from the equally lovely Graham from Dollshouse Flooring.  You may remember his Decrastone which I used for the hearths in front of my fireplaces. 


(25/08/17)